Rear Side Door Adjustment
Removal Procedure Up/Down or In/Out Adjustment
- Apply a double layer of masking tape around the perimeter of the painted surfaces.
- Rear Side Door Hinge Bolt - Door Side » Loosen Do NOT remove the bolts from the door.
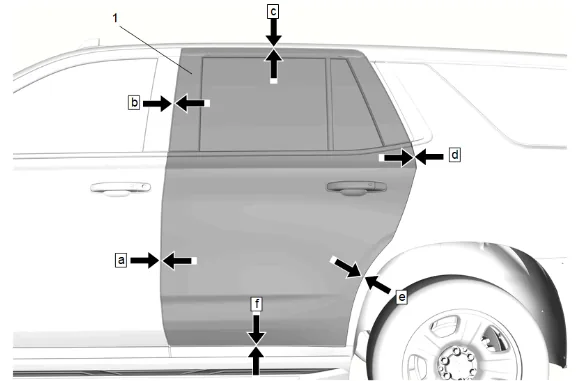
- Adjust the rear side door (1) up or down by repositioning the door as necessary. Rear side door (1) to body side outer panel (c) 6.5 mm ± 1.0 mm (0.25 in ± 0.04 in) Rear side door (1) to rocker panel molding (f) 5.0 mm ± 1.5 mm (0.19 in ± 0.06 in)
- Adjust the rear side door (1) in or out by repositioning the door as necessary. Rear side door (1) to front side door (a) 3.5 mm ± 0.75 mm (0.14 in ± 0.03 in) Ensure the rear side door window frame front applique and front side door window frame rear applique gap (b) is 5.0 ± 1.25 mm (0.20 ± 0.05 in) Ensure the rear side door weatherstrip to body side outer panel gap (c) is consistent and the weatherstrip is fully seated. Ensure the rear side door window frame rear applique to body side upper rear applique gap (d) is 6.5 mm ± 1.0 mm (0.25 in ± 0.04 in) Rear side door (1) to body side outer panel (e) 3.5 mm ± 0.75 mm (0.14 in ± 0.03 in) Rear side door (1) to rocker panel molding (f) 5.0 mm ± 1.5 mm (0.19 in ± 0.06 in) Installation Procedure
- Rear Side Door Hinge Bolt - Door Side » Tighten — Fastener Specifications
- Inspect the door for proper operation and alignment.
- Adjust the rear side door latch striker, if needed. Rear Side Door Latch Striker Adjustment
- Remove the tape.
- Remove any remaining adhesive residue with a 50/50 mixture by volume of isopropyl alcohol and clean drinkable water. Wipe the surface dry with a clean lint-free towel. Removal Procedure Fore/Aft Adjustment
- Apply a double layer of masking tape around the perimeter of the painted surfaces.
- Rear Side Door Hinge Bolt - Body Side » Loosen Do NOT remove the bolts from the door.
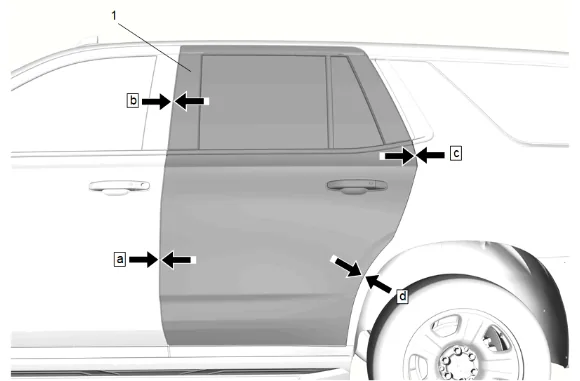
- Adjust the rear side door (1) fore and aft by repositioning the door as necessary. Rear side door (1) to front side door (a) 3.5 mm ± 0.75 mm (0.14 in ± 0.03 in) Rear side door window frame front applique to front side door window frame rear applique (b) 5.0 ± 1.25 mm (0.20 ± 0.05 in) Rear side door window frame rear applique to body side upper rear applique (c) 6.5 mm ± 1.0 mm (0.25 in ± 0.04 in) Rear side door (1) to body side outer panel (d) 3.5 mm ± 0.75 mm (0.14 in ± 0.03 in) Installation Procedure
- Rear Side Door Hinge Bolt - Body Side » Tighten — Fastener Specifications
- Inspect the door for proper operation and alignment.
- Adjust the rear side door latch striker, if needed. Rear Side Door Latch Striker Adjustment
- Remove the tape.
- Remove any remaining adhesive residue with a 50/50 mixture by volume of isopropyl alcohol and clean drinkable water. Wipe the surface dry with a clean lint-free towel.