Shock Absorber, Shock Absorber Component, or Spring Replacement (F47)
Shock Absorber, Shock Absorber Component, or Spring Replacement (F47) Single Use Fasteners and Components Rear Air Spring Seal Rear Shock Absorber Lower Spacer [2x] Rear Shock Absorber Seal [3x] Rear Shock Absorber Upper Insulator Rear Suspension Strut Washer Special Tools CH-45400-100 Strut Compressor Adapters CH-48845 Strut Spring Compressor CH-50732-A Strut Rod Nut Socket CH-52667 Air Spring Inflator Equivalent regional tools: Special Tools
- Raise the vehicle until the tires are off the ground. Lifting and Jacking the Vehicle
- Using the scan tool, deflate the air spring that will be serviced.
- Remove the rear tire and wheel assembly. Tire and Wheel Removal and Installation
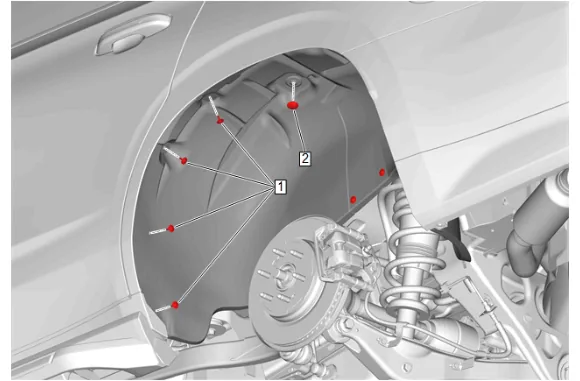
- Rear Wheelhouse Liner Bolt (1) » Remove [4x]
- Rear Wheelhouse Liner Retainer (2) » Remove
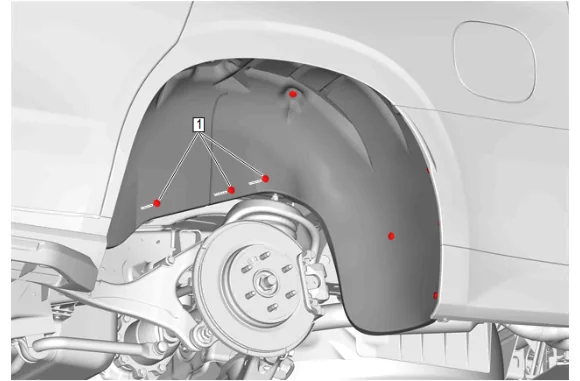
- Rear Wheelhouse Liner Bolt (1) » Remove [3x]
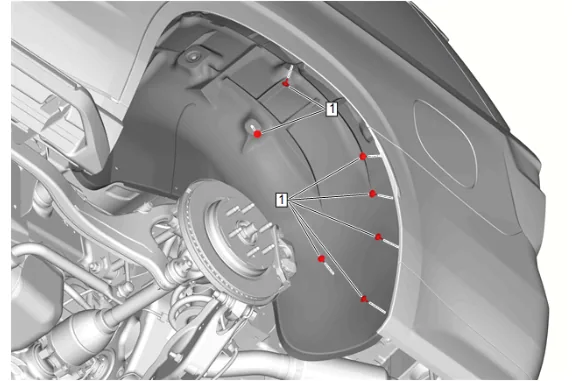
- Rear Wheelhouse Liner Bolt (1) » Remove [7x]
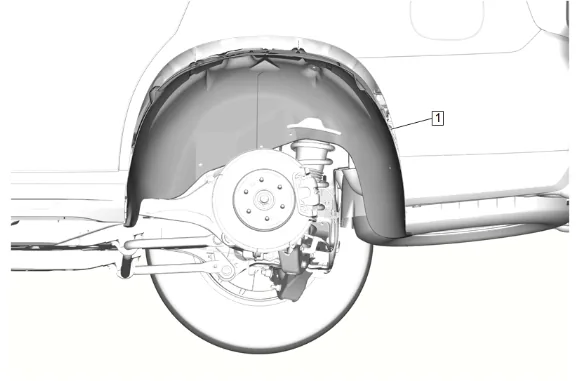
- Rear Wheelhouse Liner (1) » Remove
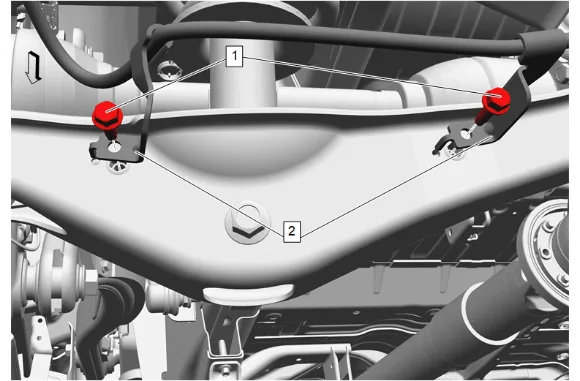
- Rear Brake Hose Bracket Bolt (1) » Remove [2x]
- Rear Brake Hose Bracket (2) » Remove [2x]
- Using a suitable jack stand, support the rear suspension lower control arm.
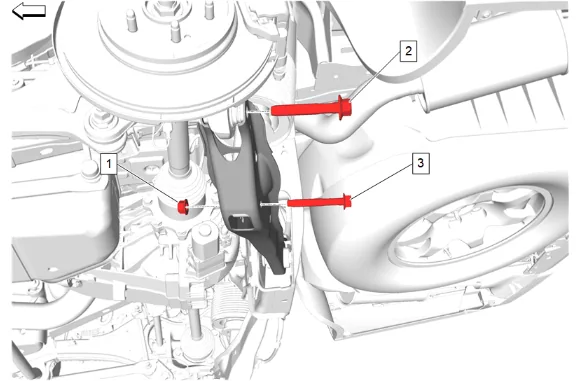
- Rear Shock Absorber Nut (1) » Remove
- Rear Shock Absorber Bolt (3) » Remove
- Rear Suspension Lower Control Arm Outer Bolt (2) » Remove
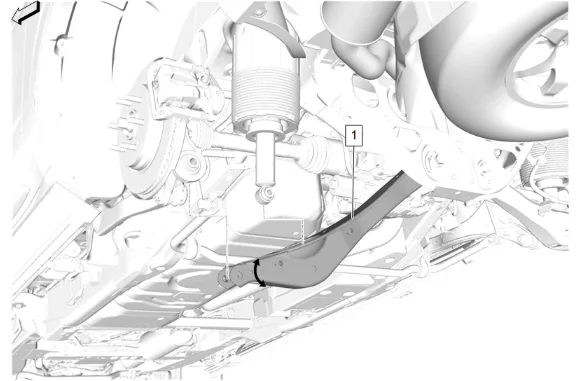
- Using the jack stand, lower the rear suspension lower control arm (1) to allow clearance for removal of the rear shock absorber.
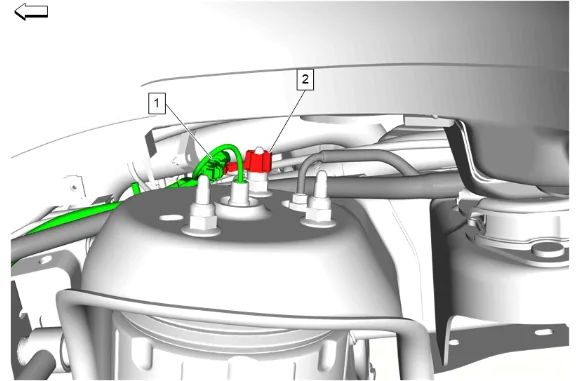
- Chassis Rear Wiring Harness Clip (2) » Remove
- Electrical Connector (1) » Disconnect
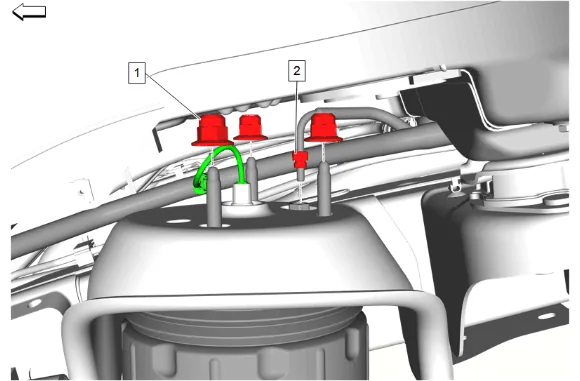
- Rear Shock Absorber Nut (1) » Remove [3x]
- Remove the air line nut (2) and reposition the air line.
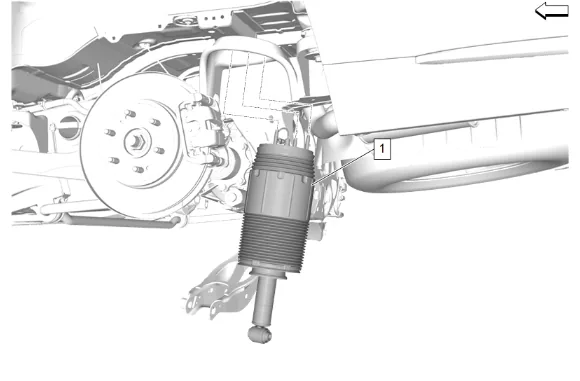
- Rear Shock Absorber (1) » Remove Disassembly Procedure
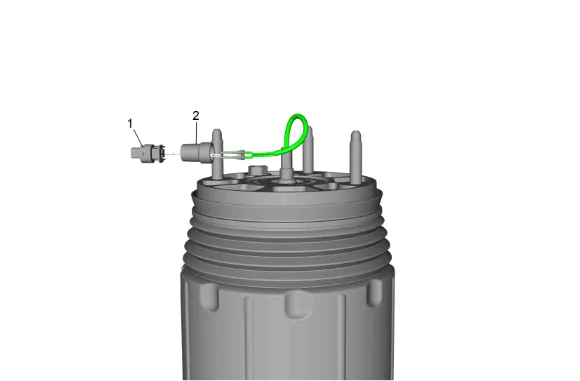
- Remove the electrical terminals from the electronic suspension position sensor electrical connector (1). Terminal Removal
- Remove the rear suspension upper mounting cap (2).
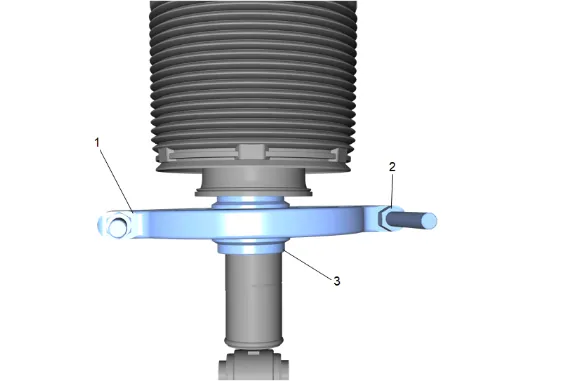
- Place the split collar of the CH-45400-100 Strut Compressor Adapters (3) onto the rear shock absorber contacting the bottom of the retaining ring.
- Install the CH-45400-100 Strut Compressor Adapters (1) around the split collars, hand tightening the 2 nuts (2).
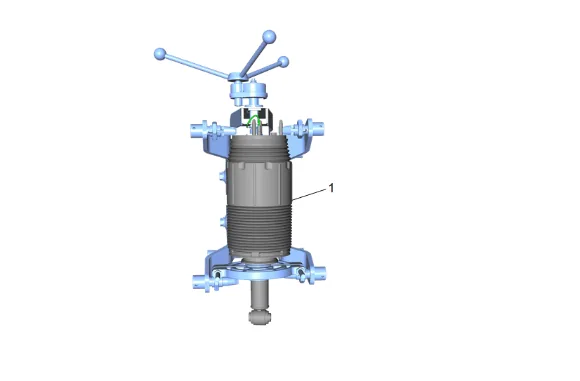
- Install and secure the rear shock absorber (1) with CH-45400-100 Strut Compressor Adapters into the CH-48845 Strut Spring Compressor ensuring that it is properly positioned as shown.
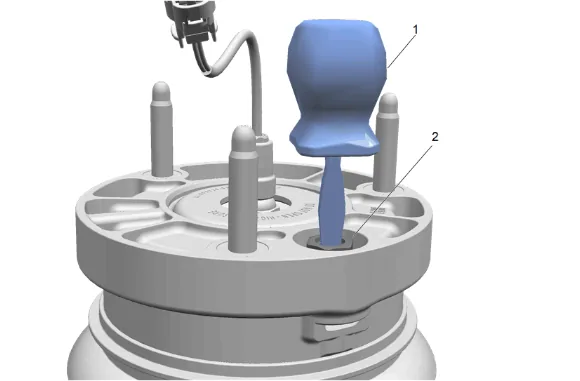
- Using a small screwdriver (1) depress the valve (2) to relieve any remaining pressure in the air spring.
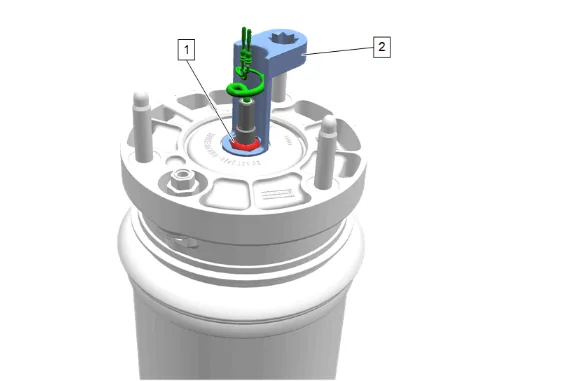
- Remove the rear shock absorber shock rod mount nut (1) using CH-50732-A Strut Rod Nut Socket (2) and a suitable wrench to hold the shock rod.
- Remove the rear shock absorber from the CH-48845 Strut Spring Compressor.
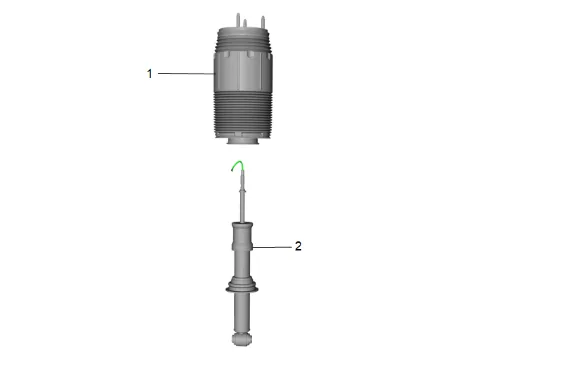
- Remove the rear air spring (1) from the rear shock absorber (2).
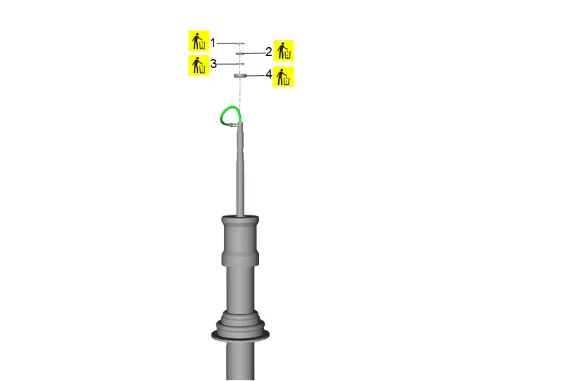
- Remove and DISCARD the rear shock absorber lower spacer (1).
- Remove and DISCARD the rear air spring seal (2).
- Remove and DISCARD the rear shock absorber lower spacer (3).
- Remove and DISCARD the rear shock absorber upper insulator (4).
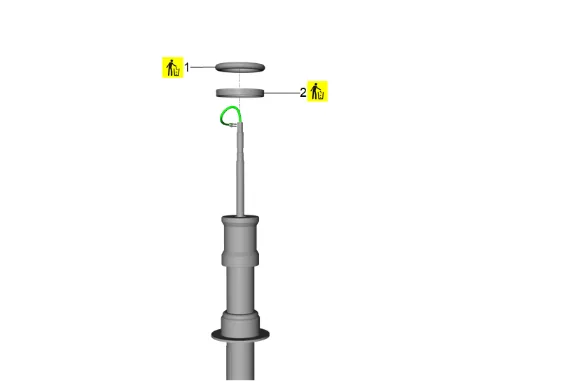
- Remove and DISCARD the rear shock absorber seal (1).
- Remove and DISCARD the rear suspension strut washer (2).
-
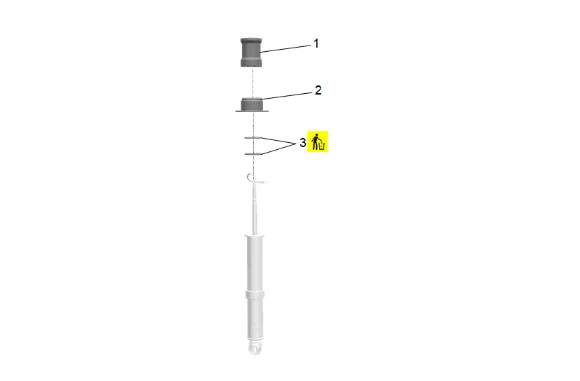
Remove the jounce plate assembly (1).
-
Remove the rear lower spring seat (2).
-
Rear Shock Absorber Seal (3) » Remove and DISCARD [2x]
-
Inspect the components and replace as necessary. Assembly Procedure
-
Rear Shock Absorber Seal (3) » Install NEW [2x]
-
Install the rear lower spring seat (2).
-
Install the jounce plate assembly (1).
- Install the NEW rear suspension strut washer (2).
- Place electrical tape around the threads of the rear air shock absorber to prevent damage to the seal in the rear air spring.
- Install the NEW rear shock absorber seal (1).
- Install the NEW rear shock absorber upper insulator (4).
- Install the NEW rear shock absorber lower spacer (3).
- Install the NEW rear air spring seal (2).
- Install the NEW rear shock absorber lower spacer (1).
- Remove electrical tape from rear air shock absorber threads.
- Install the rear air spring (1) to the rear air shock absorber.
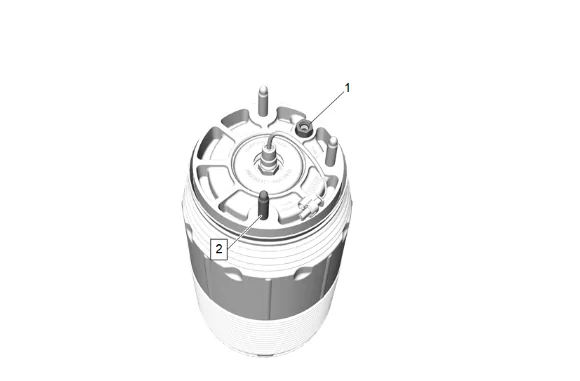
- Identify the stud (2) in relationship to the airline valve (1).
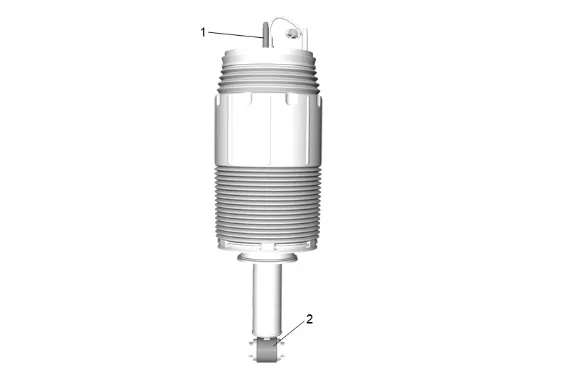
-
Ensure the identified stud (1) is aligned to the Shock absorber bushing barrel (2).
-
Place the split collar of the CH-45400-100 Strut Compressor Adapters (3) onto the rear shock absorber contacting the bottom of the retaining ring.
- Install the CH-45400-100 Strut Compressor Adapters (1) around the split collars, hand tightening the 2 nuts (2).
- Install and secure the rear shock absorber (1) with CH-45400-100 Strut Compressor Adapters into the CH-48845 Strut Spring Compressor ensuring that it is properly positioned as shown.
- Install and tighten the rear shock absorber shock rod mount nut (1) using CH-50732-A Strut Rod Nut Socket (2) and a suitable wrench to hold the shock rod. Fastener Specifications.
-
Using CH-52667 Air Spring Inflator, adjust the regulator to 2 bar (30 psi) and fill the rear air spring.
-
Remove CH-52667 Air Spring Inflator.
-
Remove the rear shock absorber (1) from the CH-48845 Strut Spring Compressor.
-
Install the rear suspension upper mounting cap (2).
-
Install the electrical terminal to the electronic suspension position sensor electrical connector (1). Terminal Removal
-
Loosen the nuts (2) and remove the strut compressor adapters (1) of the CH-45400-100 Strut Compressor Adapters.
-
Remove the split collar (3) of the CH-45400-100 Strut Compressor Adapters from the rear shock absorber. Installation Procedure
-
Rear Shock Absorber (1) » Install
-
Rear Shock Absorber Nut (1) » Install and tighten [3x] — Fastener Specifications
-
Install the air line nut (2) and tighten. Fastener Specifications
-
Electrical Connector (1) » Connect
-
Chassis Rear Wiring Harness Clip (1) » Install
-
Using the jack stand, raise the rear suspension lower control arm (1).
-
Rear Shock Absorber Bolt (3) » Install
-
Rear Shock Absorber Nut (1) » Install and tighten — Fastener Specifications
-
Rear Suspension Lower Control Arm Outer Bolt (2) » Install and tighten — Fastener Specifications
-
Remove the jack stand from under the rear suspension lower control arm.
-
Rear Brake Hose Bracket (2) » Install [2x]
-
Rear Brake Hose Bracket Bolt (1) » Install and tighten [2x] — Fastener Specifications
-
Rear Wheelhouse Liner (1) » Install
-
Rear Wheelhouse Liner Bolt (1) » Install and tighten [7x] — Fastener Specifications
-
Rear Wheelhouse Liner Bolt (1) » Install and tighten [3x] — Fastener Specifications
-
Rear Wheelhouse Liner Retainer (2) » Install
-
Rear Wheelhouse Liner Bolt (1) » Install and tighten [4x] — Fastener Specifications
-
Install the rear tire and wheel assembly. Tire and Wheel Removal and Installation
-
With the vehicle off the hoist and on flat level ground, use the scan tool to reset trim heights.