Headlining Rear Trim Panel Replacement (LWB)
- Disable the SIR system. SIR Disabling and Enabling
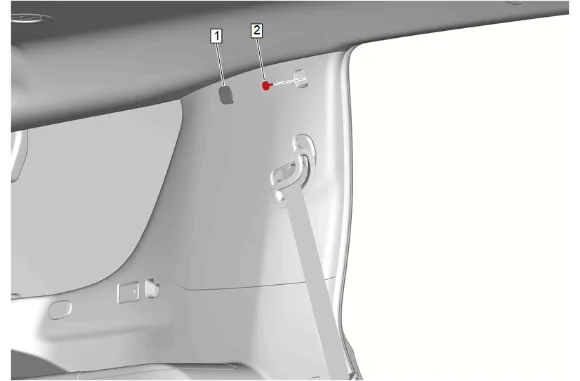
- Quarter Window Trim Finish Panel Bolt Cap (1) » Remove
- Quarter Window Trim Finish Panel Bolt (2) » Remove
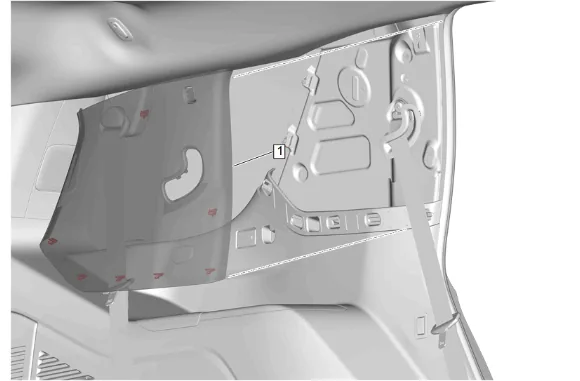
- Using a flat-bladed plastic trim tool, release the retaining clips.
- Body Lock Pillar Upper Trim Panel (1) » Reposition
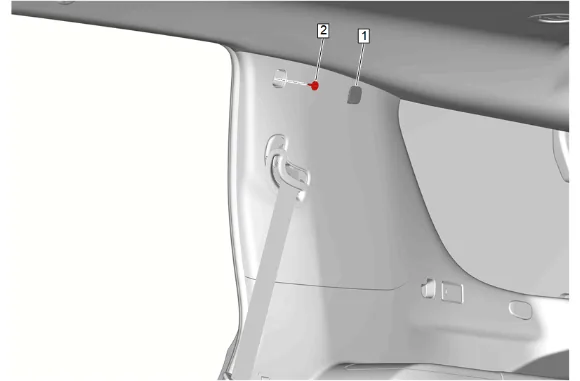
- Quarter Window Trim Finish Panel Bolt Cap (1) » Remove
- Quarter Window Trim Finish Panel Bolt (2) » Remove
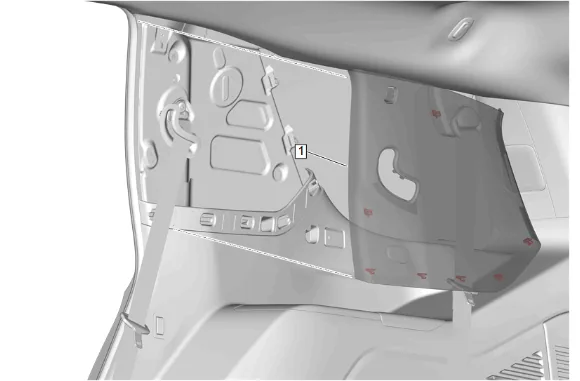
- Using a flat-bladed plastic trim tool, release the retaining clips.
- Body Lock Pillar Upper Trim Panel (1) » Reposition
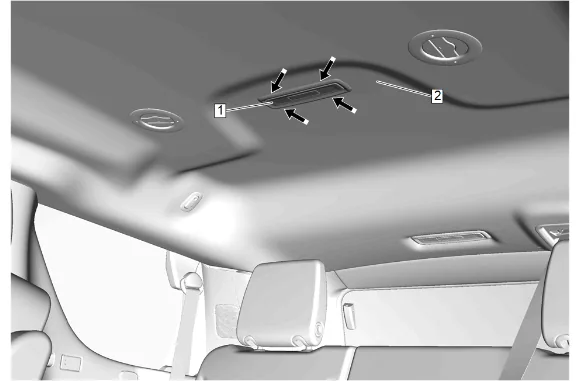
- Insert a suitable flat-bladed plastic trim tool between the rear seat position center reading and courtesy lamp (1) and headlining trim panel (2).
- Separate the rear seat position center reading and courtesy lamp (1) from the headlining trim panel (2).
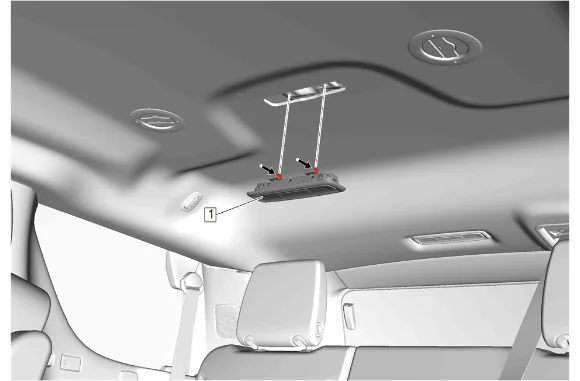
- Pull downward to release the retaining tabs.
- Disconnect the electrical connector.
- Rear Seat Position Center Reading and Courtesy Lamp - Rear (1) » Remove
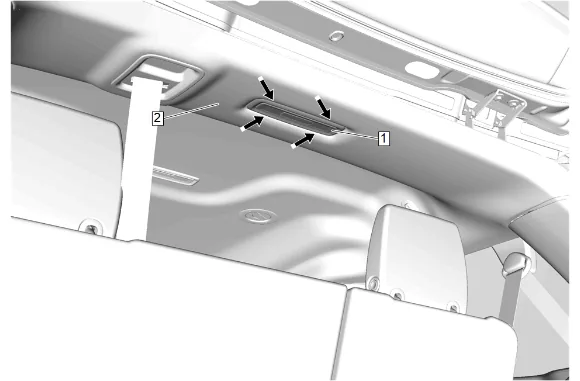
- Insert a suitable flat-bladed plastic trim tool between the cargo center courtesy lamp (1) and headlining trim panel (2).
- Separate the cargo center courtesy lamp (1) from the headlining trim panel (2).
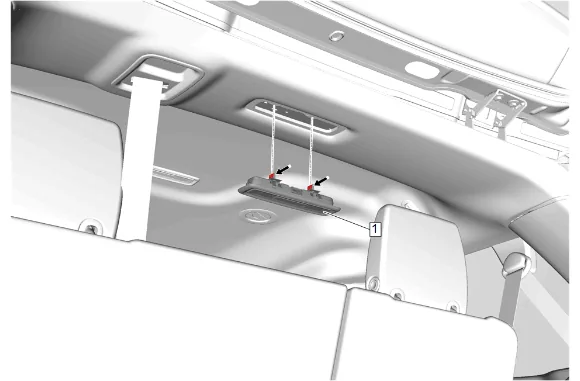
- Pull downward to release the retaining tabs.
- Disconnect the electrical connector.
- Cargo Center Courtesy Lamp (1) » Remove
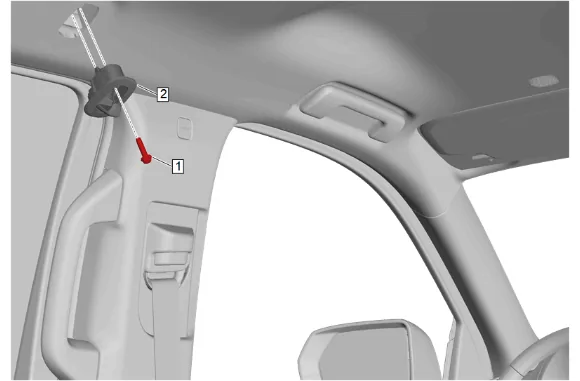
- Place the rear 2 coat hook (2) in the open position.
- Coat Hook Bolt (1) » Remove [2x]
- Coat Hook (2) » Remove [2x]
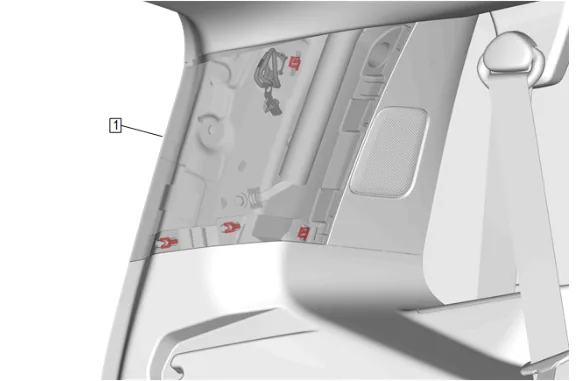
- Using a flat-bladed plastic trim tool, release the retaining clips.
- Pull the body side rear window garnish molding (1) outwards enough to access the tether fastener.
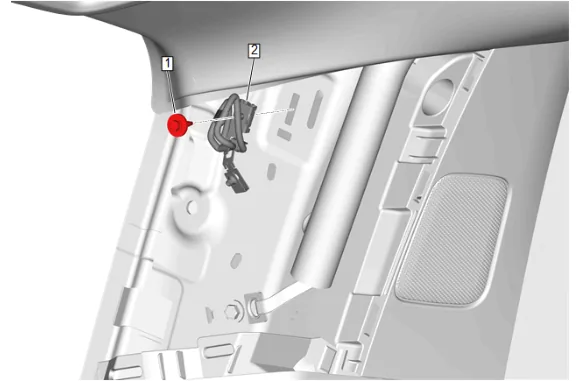
- Body Side Rear Window Garnish Molding Bolt (1) » Remove
- Body Side Rear Window Garnish Molding Tether Retaining Clip (2) » Remove
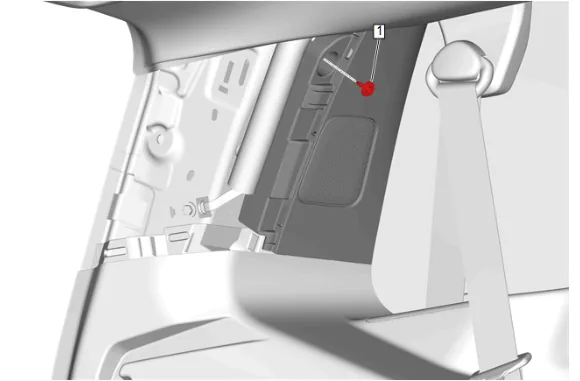
- Body Rear Corner Upper Garnish Molding Bolt (1) » Remove
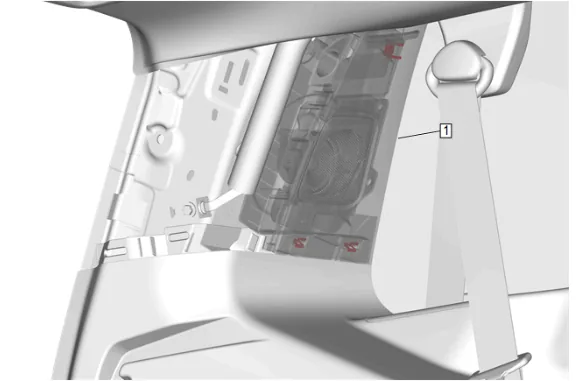
- Using a flat-bladed plastic trim tool, release the retaining clips.
- Body Rear Corner Upper Garnish Molding (1) » Reposition
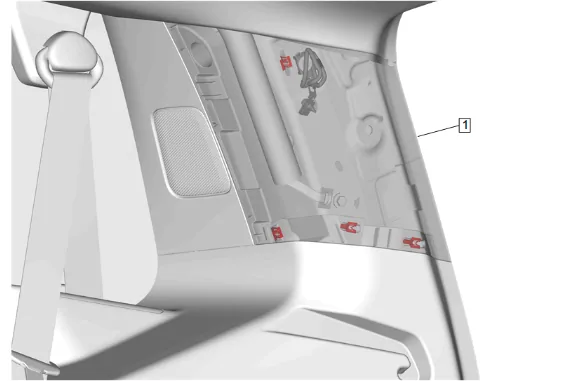
- Using a flat-bladed plastic trim tool, release the retaining clips.
- Pull the body side rear window garnish molding (1) outwards enough to access the tether fastener.
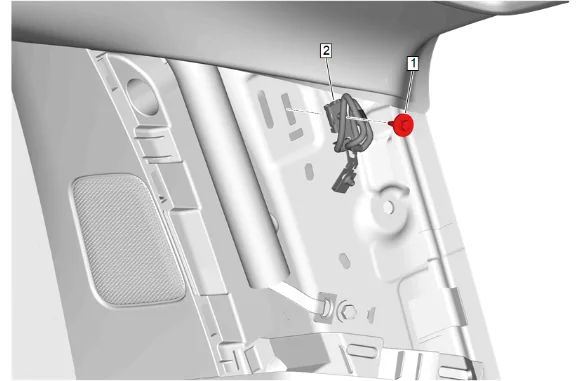
- Body Side Rear Window Garnish Molding Bolt (1) » Remove
- Body Side Rear Window Garnish Molding Tether Retaining Clip (2) » Remove
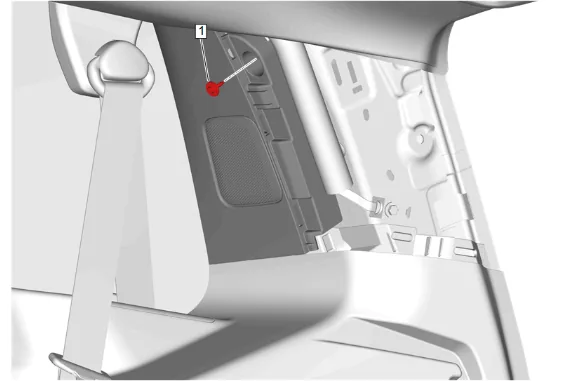
- Body Rear Corner Upper Garnish Molding Bolt (1) » Remove
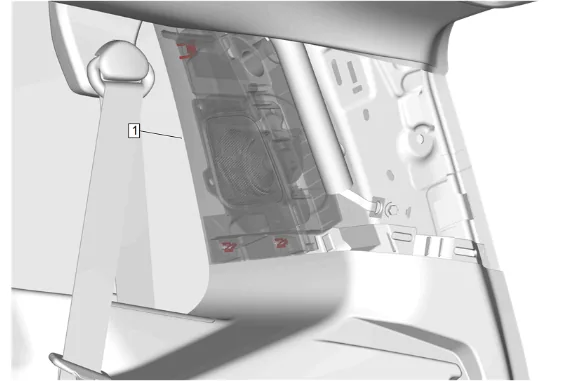
- Using a flat-bladed plastic trim tool, release the retaining clips.
- Body Rear Corner Upper Garnish Molding (1) » Reposition
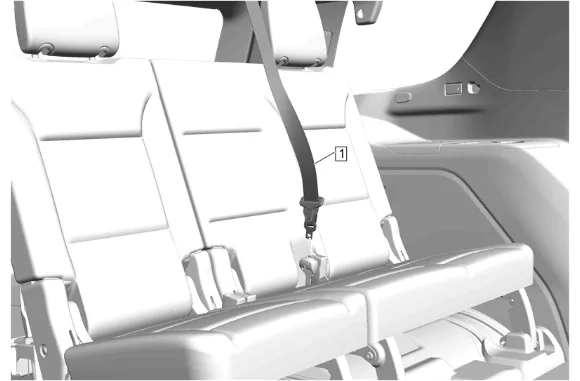
- Disconnect the rear seat belt mini-latch (1).
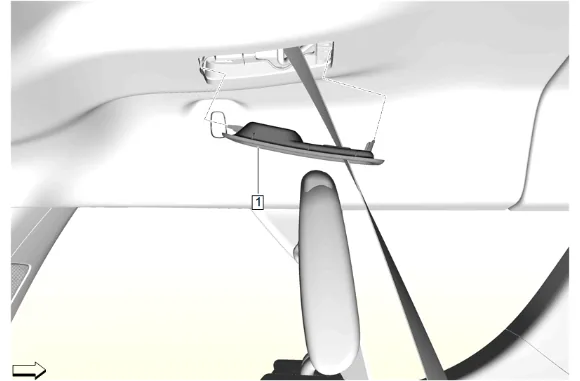
- Using a suitable plastic trim tool, release the retaining tabs.
- Rear Seat Center Belt Opening Bezel - 3rd Row Seat (1) » Remove
- Feed the 3rd row seat center belt through the rear seat center belt opening bezel (1).
- Feed the back half of the seat belt opening bezel through the headlining opening.
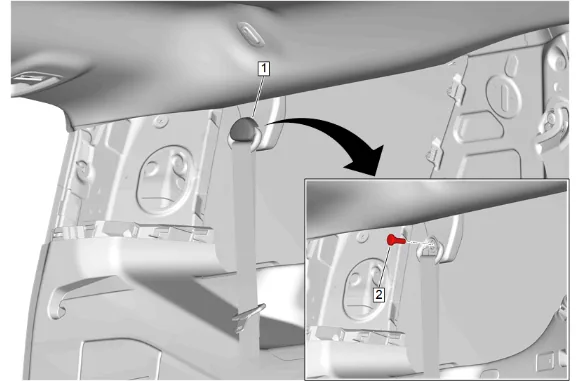
- 3rd Row Seat Belt Guide Cover (1) » Open
- Rear Seat Belt Guide Bolt (2) » Remove [2x]
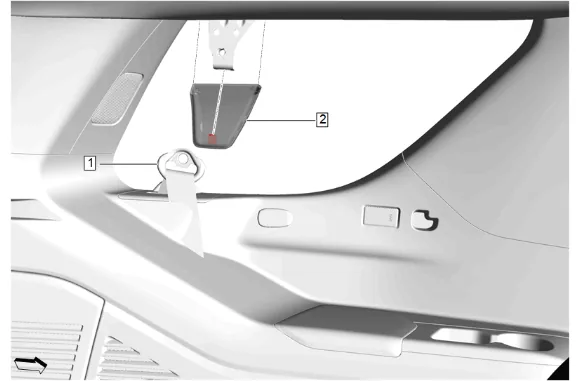
- 3rd Row Seat Belt Guide (1) » Reposition
- Using a suitable trim tool, gently pry and pull downwards on the rear seat belt opening bezel (2) to release the retaining clip on both sides of the vehicle.
- Rear Seat Belt Opening Bezel (2) » Remove [2x]
- Pull down at the rear of the headlining front trim panel to disengage the retaining clips and to gain access to the trim panel retainers holding the headlining rear trim panel.
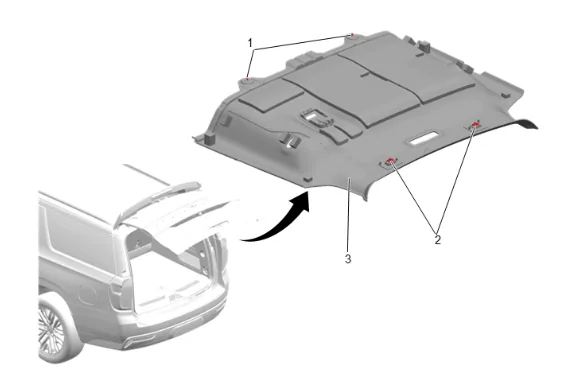
- Headlining Trim Panel Retainer (1) » Remove [2x]
- Disengage the retaining clips (2) at the rear of the headliner rear trim panel.
- Lower the headlining rear trim panel (3).
- Disconnect the electrical connector.
- With the aid of an assistant, remove the headlining rear trim panel (3) from the vehicle through the liftgate opening.
- Transfer components as necessary.
- If transferring or replacing the wiring harness. Take note of the wiring harness locations and measure the harness lead length prior to removing. Mark harness routing locations on new headlining trim panel prior to harness removal.
-
Install the headlining wiring harness, if necessary. Lay the wiring harness on the new headlining rear trim panel (3) to confirm correct routing and ensure harness leads are proper length for mating connections prior to gluing. Use hot melt adhesive to install the wiring harness. Adhesives, Fluids, Lubricants, and Sealers Apply insulator tape over glued locations to prevent squeaks and rattles as needed.
-
With the aid of an assistant, position the headlining rear trim panel (3) into the vehicle through the liftgate opening.
-
Connect the electrical connector.
-
Engage the retaining clips (2) at the rear underside of the headlining rear trim panel (3).
-
Headlining Rear Trim Panel (3) » Install
-
Headlining Trim Panel Retainer (1) » Install [2x]
-
Push up at the rear of the headlining front trim panel to engage the retaining clips.
-
Rear Seat Belt Opening Bezel (2) » Install [2x]
-
3rd Row Seat Belt Guide (1) » Install [2x]
-
Rear Seat Belt Guide Bolt (2) » Install and tighten [2x] — Fastener Specifications
-
3rd Row Seat Belt Guide Cover (1) » Close
-
Feed the back half of the seat belt opening bezel through the headlining opening.
-
Feed the 3rd row seat center belt through the rear seat center belt opening bezel (1).
-
Rear Seat Center Belt Opening Bezel - 3rd Row Seat (1) » Install
-
Connect the rear seat belt mini-latch (1).
-
Body Rear Corner Upper Garnish Molding (1) » Reposition
-
Body Rear Corner Upper Garnish Molding Bolt (1) » Install and tighten — Fastener Specifications
-
Body Side Rear Window Garnish Molding Tether Retaining Clip (2) » Install
-
Body Side Rear Window Garnish Molding Bolt (1) » Install and tighten — Fastener Specifications
-
Body Side Rear Window Garnish Molding (1) » Install
-
Body Rear Corner Upper Garnish Molding (1) » Reposition
-
Body Rear Corner Upper Garnish Molding Bolt (1) » Install and tighten — Fastener Specifications
-
Body Side Rear Window Garnish Molding Tether Retaining Clip (2) » Install
-
Body Side Rear Window Garnish Molding Bolt (1) » Install and tighten — Fastener Specifications
-
Body Side Rear Window Garnish Molding (1) » Install
-
Coat Hook (2) » Install [2x]
-
Coat Hook Bolt (1) » Install and tighten [2x] — Fastener Specifications
-
Connect the electrical connector.
-
Cargo Center Courtesy Lamp (1) » Install
-
Apply pressure upward on the cargo center courtesy lamp (1) to engage the retaining tabs.
-
Connect the electrical connector.
-
Rear Seat Position Center Reading and Courtesy Lamp - Rear (1) » Install
-
Apply pressure upward on the rear seat position center reading and courtesy lamp (1) to engage the retaining tabs.
-
Body Lock Pillar Upper Trim Panel (1) » Reposition
-
Quarter Window Trim Finish Panel Bolt (2) » Install and tighten — Fastener Specifications
-
Quarter Window Trim Finish Panel Bolt Cap (1) » Install
-
Body Lock Pillar Upper Trim Panel (1) » Reposition
-
Quarter Window Trim Finish Panel Bolt (2) » Install and tighten — Fastener Specifications
-
Quarter Window Trim Finish Panel Bolt Cap (1) » Install
-
Enable the SIR System. SIR Disabling and Enabling