Engine Oil Cooler Replacement (LM2 with 4WD)
Single Use Fasteners and Components Engine Oil Cooler Gasket [3x] Oil Filter Removal Procedure
- Drain the cooling system. Cooling System Draining and Filling
- Drain the engine oil. Engine Oil and Oil Filter Replacement
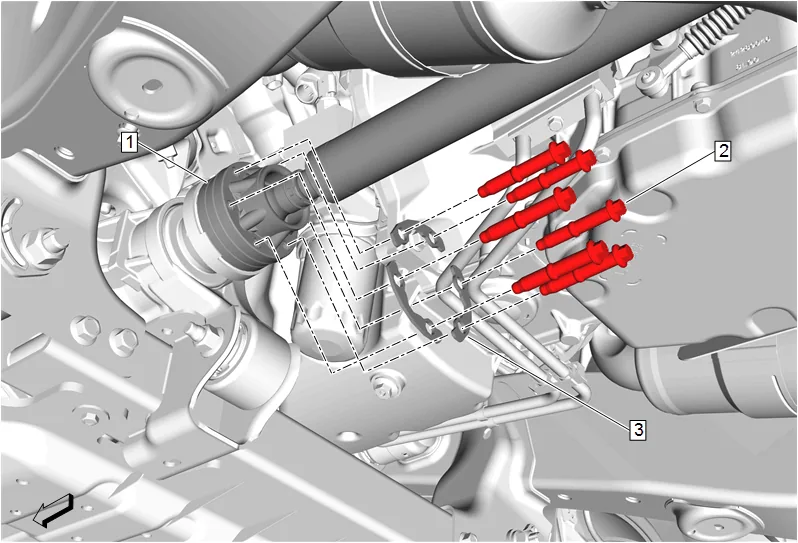
- Mark a reference point between the front axle propeller shaft (1) and the front differential drive pinion gear yoke.
- Front Axle Propeller Shaft Bolt (2) » Remove [6x]
- Front Axle Propeller Shaft Washer (3) » Remove [3x]
- Front Axle Propeller Shaft » Reposition away
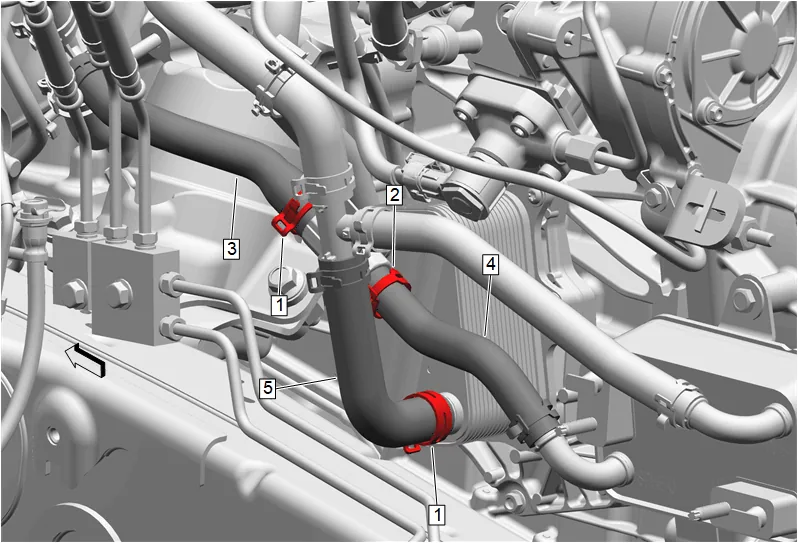
- Thermostat Bypass Hose Clamp (1) » Disengage [2x] — Hose Clamp Replacement Guidelines - Spring Type
- Engine Oil Cooler Coolant Inlet Hose Clamp (2) » Disengage — Hose Clamp Replacement Guidelines - Spring Type
- Engine Oil Cooler Coolant Outlet Hose (3) @ Engine Oil Cooler » Remove
- Automatic Transmission Fluid Cooling Heat Exchanger Outlet Hose (4) @ Engine Oil Cooler » Remove
- Engine Oil Cooler Coolant Inlet Hose (5) @ Engine Oil Cooler » Remove
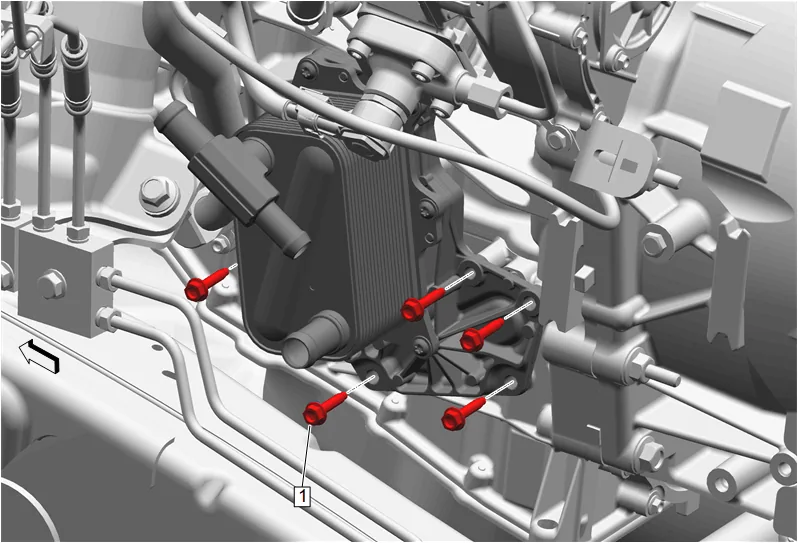
- Engine Oil Cooler Bolt (1) » Remove [5x]
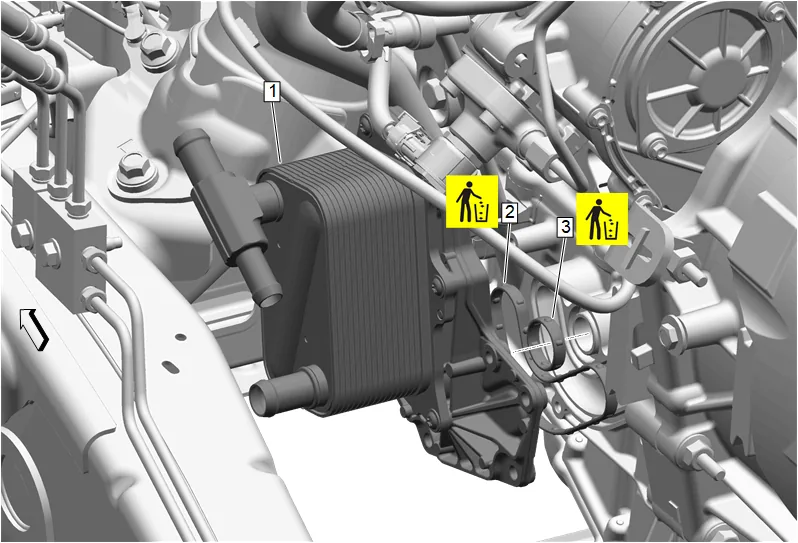
- Remove the engine oil cooler (1) and engine oil cooler bracket as an assembly.
- Engine Oil Cooler Gasket (2) » Remove and DISCARD
- Engine Oil Cooler Gasket (3) » Remove and DISCARD
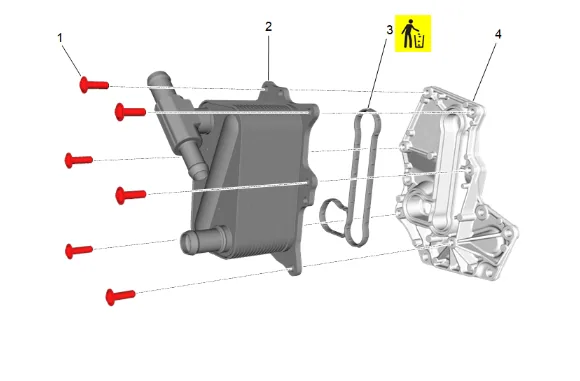
- Engine Oil Cooler Bolt (1) » Remove [6x]
- Engine Oil Cooler (2) » Remove
- Engine Oil Cooler Gasket (3) @ Engine Oil Cooler Bracket (4) » Remove and DISCARD Cleaning and Inspection Procedure - Conditional
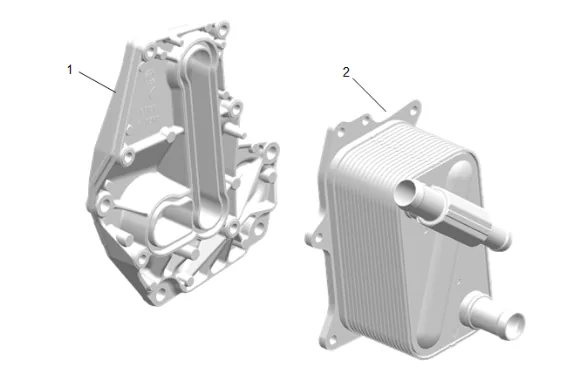
-
Clean the engine oil cooler bracket (1) and engine oil cooler (2).
-
Inspect the engine oil cooler bracket (1) and engine oil cooler (2).
-
Replace the engine oil cooler bracket (1) and/or engine oil cooler (2) if any damage is found. Installation Procedure
-
Engine Oil Cooler Gasket (3) @ Engine Oil Cooler Bracket (4) » Install NEW
-
Engine Oil Cooler (2) » Install
-
Engine Oil Cooler Bolt (1) » Install and hand tighten [6x]
-
Engine Oil Cooler Bolt (1) » Tighten in sequence [6x] — Fastener Specifications
-
Engine Oil Cooler Gasket (3) » Install NEW
-
Engine Oil Cooler Gasket (2) » Install NEW
-
Install the engine oil cooler (1) and engine oil cooler bracket as an assembly.
-
Engine Oil Cooler Bolt (1) » Install and hand tighten [5x]
-
Engine Oil Cooler Bolt (1) » Tighten in sequence [5x] — Fastener Specifications
-
Engine Oil Cooler Coolant Inlet Hose (5) @ Engine Oil Cooler » Install
-
Automatic Transmission Fluid Cooling Heat Exchanger Outlet Hose (4) @ Engine Oil Cooler » Install
-
Engine Oil Cooler Coolant Outlet Hose (3) @ Engine Oil Cooler » Install
-
Engine Oil Cooler Coolant Inlet Hose Clamp (2) » Engage — Hose Clamp Replacement Guidelines - Spring Type
-
Thermostat Bypass Hose Clamp (1) » Engage [2x] — Hose Clamp Replacement Guidelines - Spring Type
-
If NEW threaded components are being installed, loosen the adhesive using a metal pick or similar tool before proceeding. If threaded components are reused, prepare the threaded components using the following steps: 15.1. Remove any loose cured adhesive from the external threads of the components using a lint free cloth. 15.2. Thread the cleaned components into the internal mating threads and remove to loosen trapped cured adhesive. 15.3. Apply thread locking adhesive to the external threads of the components. Adhesives, Fluids, Lubricants, and Sealers 15.4. Ensure there are no gaps in the thread locking adhesive once applied to the component.
-
Front Axle Propeller Shaft (1) » Reposition
-
Align the reference marks made between the front axle propeller shaft (1) and the front differential drive pinion gear yoke.
-
Front Axle Propeller Shaft Washer (3) » Install [3x]
-
Install the 6 front axle propeller shaft bolts (2) and tighten in a crisscross pattern. Fastener Specifications
-
Fill the engine oil to the proper level with NEW engine oil. Engine Oil and Oil Filter Replacement
-
Fill the cooling system. Cooling System Draining and Filling
-
Start the engine and check for leaks.