Engine Mount Bracket Replacement - Left Side (2WD)
Single Use Fasteners and Components Engine Mount Engine Side Bolt [2x] Engine Mount Frame Side Bolt [3x] Engine Oil Cooler Gasket - Large Engine Oil Cooler Gasket - Small Transmission Fluid Cooler Seal Transmission Fluid Cooler Pipe Seal [2x] Turbocharger Coolant Feed and Return Pipe Gasket Special Tools EN-36857 Engine Lift Bracket EN-51768 Engine Support Fixture Adaptor Bolt - M8 Equivalent regional tools: Special Tools
- Oil Filler Cap » Remove
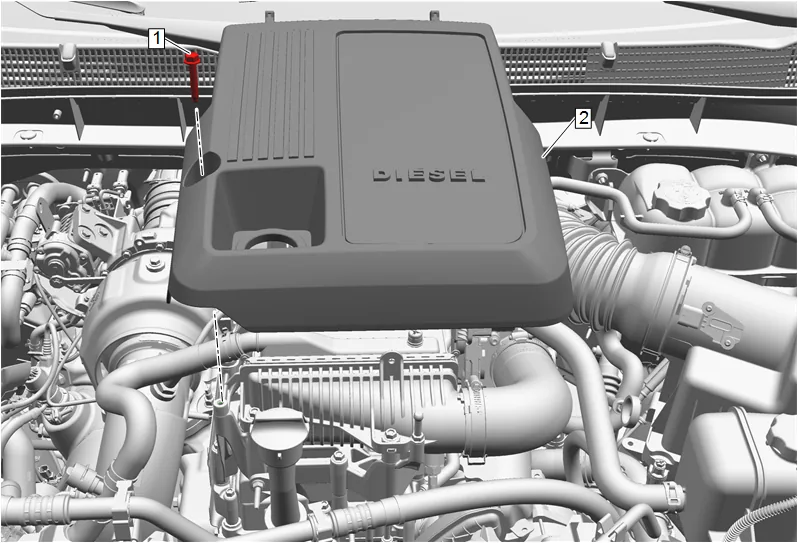
- Intake Manifold Cover Bolt (1) » Remove
- Intake Manifold Cover (2) » Remove
- Install the oil filler cap after removal of the intake manifold cover to prevent debris from falling into the engine.
- Drain the cooling system. Cooling System Draining and Filling
- Drain the engine oil. Engine Oil and Oil Filter Replacement
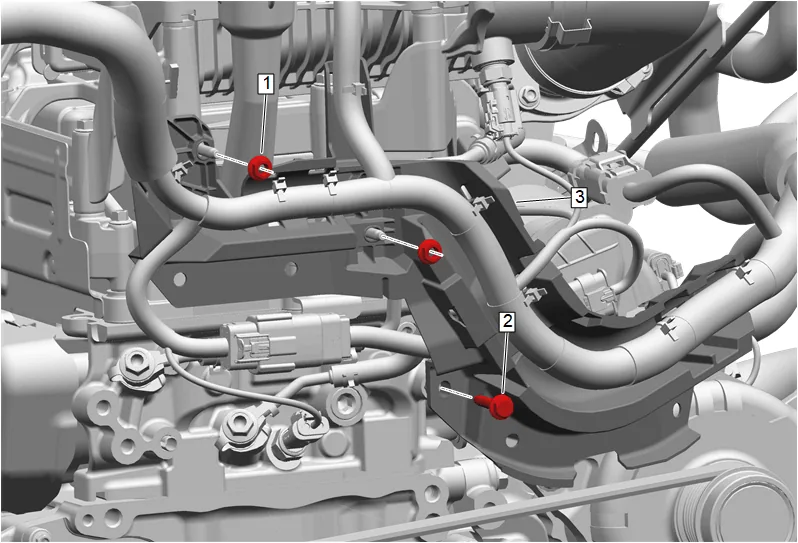
- Engine Wiring Harness Bracket Nut (1) » Remove [2x]
- Engine Wiring Harness Bracket Bolt (2) » Remove
- Reposition the engine wiring harness channel (3) away from the front of the engine.
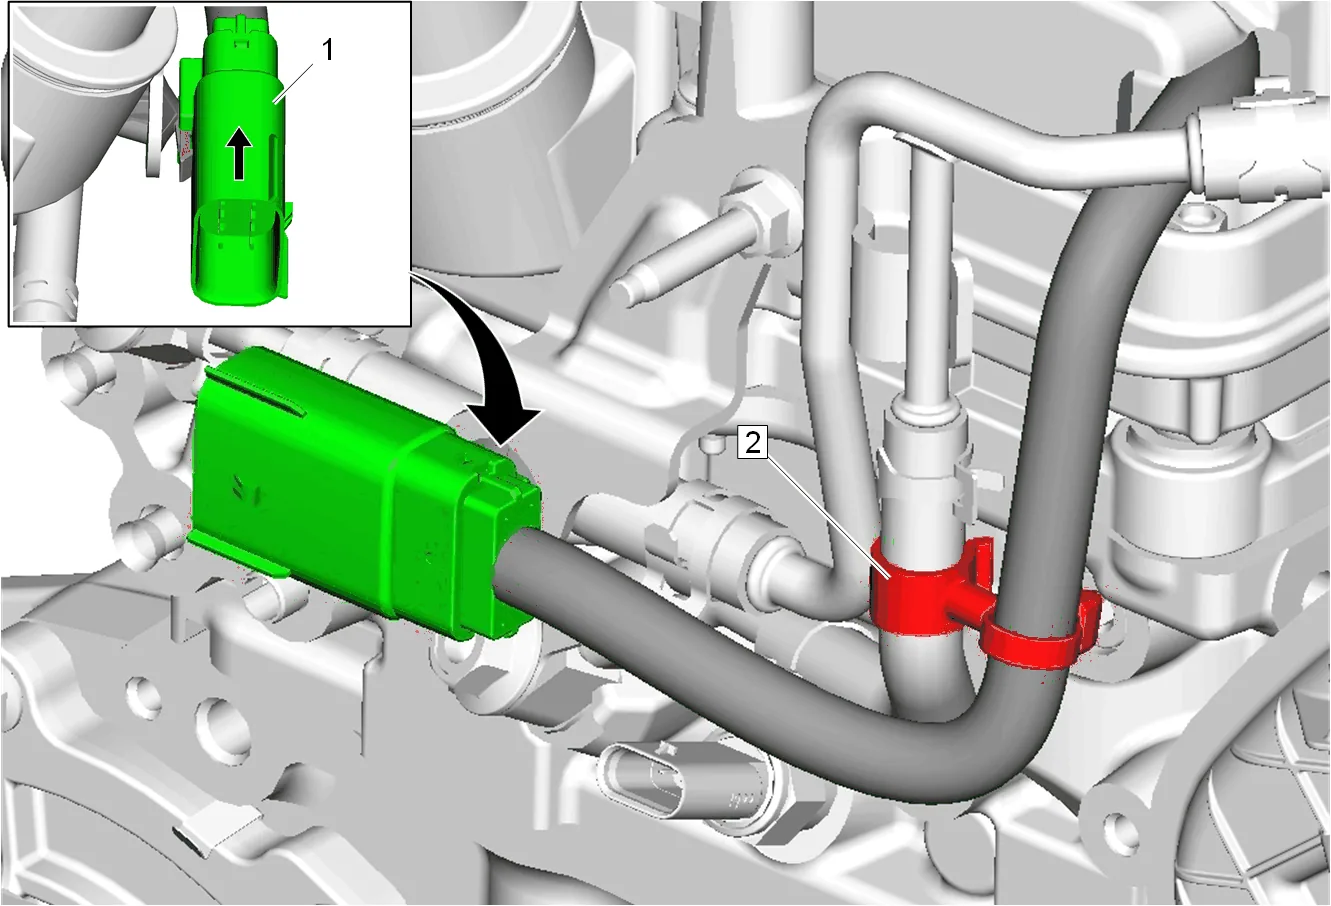
- Remove the fuel injector wiring harness connector (1) from the engine coolant air bleed bracket.
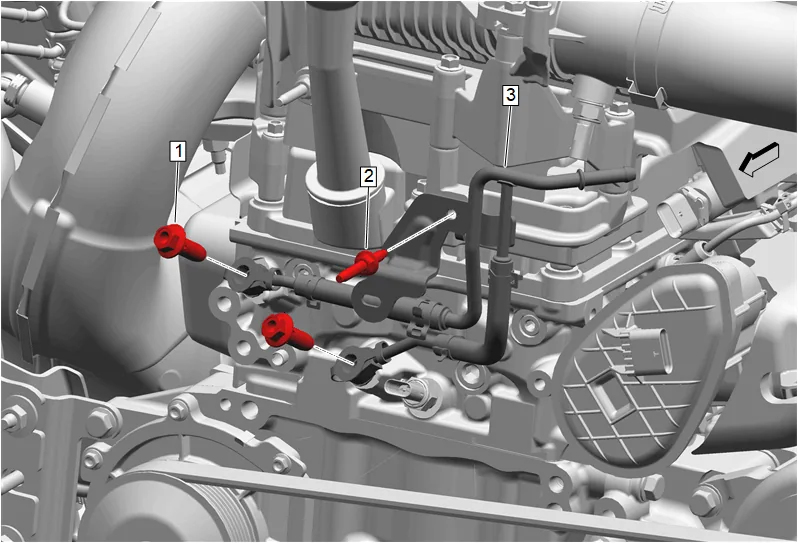
- Remove the upper left upper coolant air bleed hose bolt (1) and position the left upper air bleed hose aside.
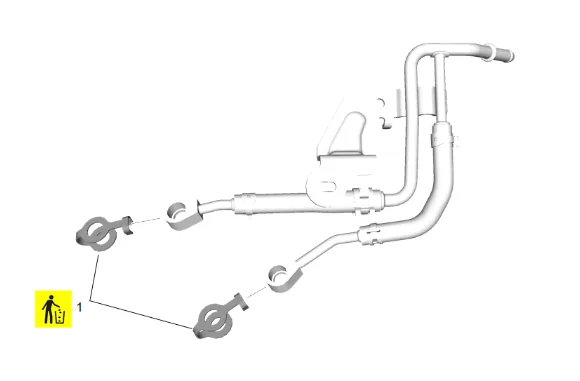
- Turbocharger Coolant Feed and Return Pipe Gasket - Left Side Upper (1) » Remove and DISCARD
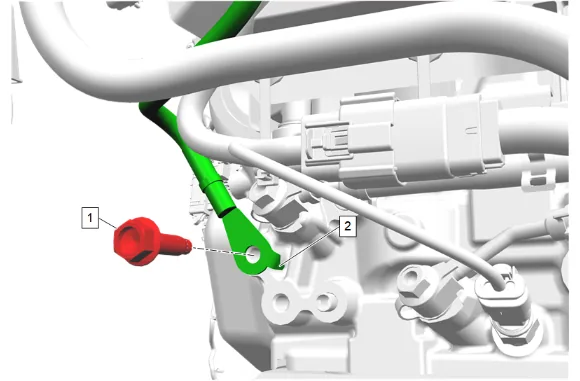
- { If equipped } Engine Wiring Harness Ground Bolt (1) » Remove
- { If equipped } Ground Cable (2) » Position aside
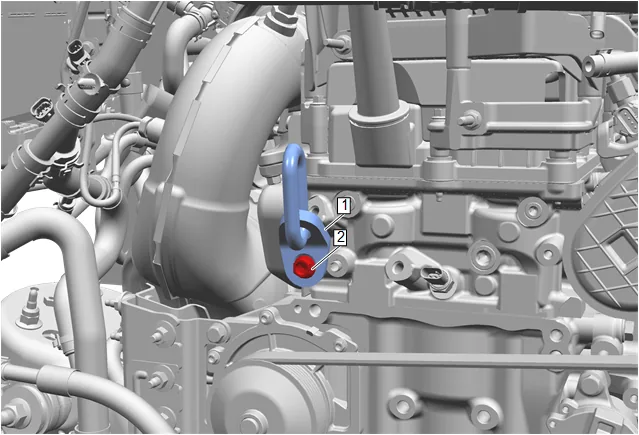
- Install the EN-36857 Engine Lift Bracket (1) to the front left side of the cylinder head as shown using the EN-51768 Engine Support Fixture Adaptor Bolt - M8 (2).
- Front Wheelhouse Liner - Left Side » Remove — Front Wheelhouse Liner Replacement
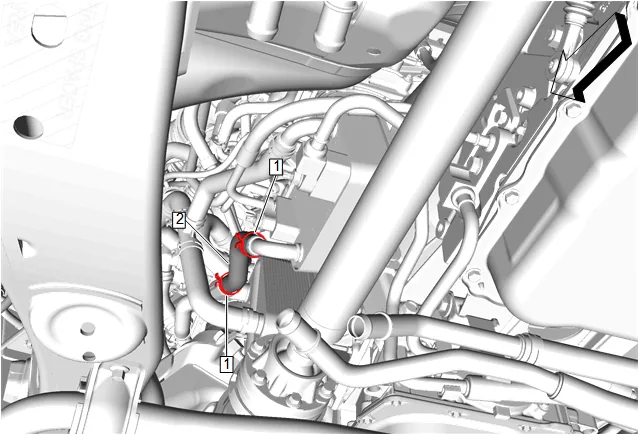
- Place a drain pan under the vehicle.
- Automatic Transmission Fluid Cooling Heat Exchanger Outlet Hose Clamp (1) » Disengage [2x] — Hose Clamp Replacement Guidelines - Spring Type
- Automatic Transmission Fluid Cooling Heat Exchanger Outlet Hose (2) » Remove
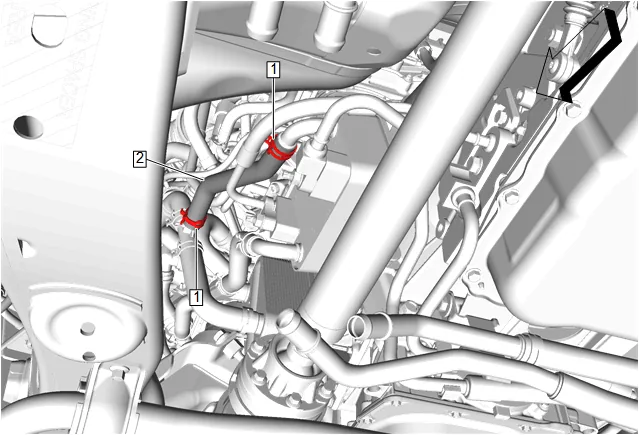
- Automatic Transmission Fluid Cooling Heat Exchanger Inlet Hose Clamp (1) » Disengage [2x] — Hose Clamp Replacement Guidelines - Spring Type
- Automatic Transmission Fluid Cooling Heat Exchanger Inlet Hose (2) » Remove
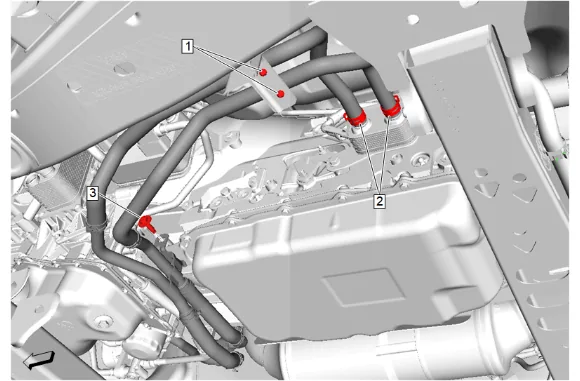
- Fuel Heater Inlet and Outlet Bolt (3) » Remove
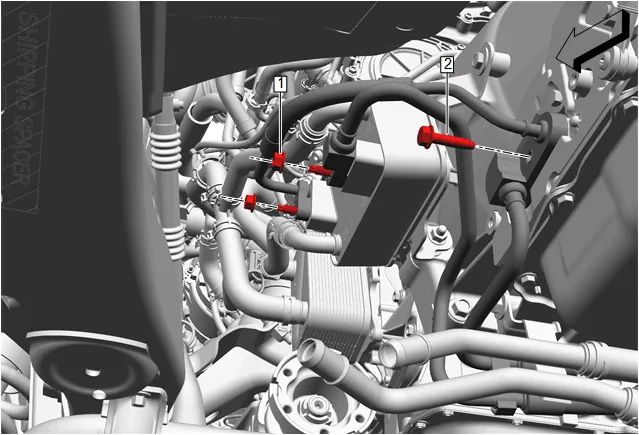
- Transmission Fluid Cooler Pipe Nut (1) » Remove [2x]
- Transmission Fluid Cooler Pipe Bolt (2) » Remove
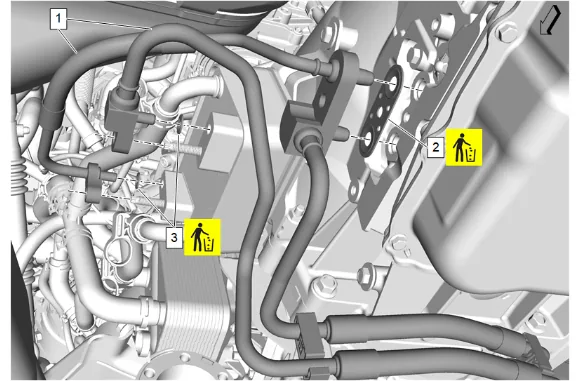
- Transmission Fluid Cooler Pipe (1) » Remove
- Transmission Fluid Cooler Seal (2) » Remove and DISCARD
- Transmission Fluid Cooler Pipe Seal (3) » Remove and DISCARD [2x]
- Cap the fittings and plug the holes when removing the transmission fluid cooler pipes.
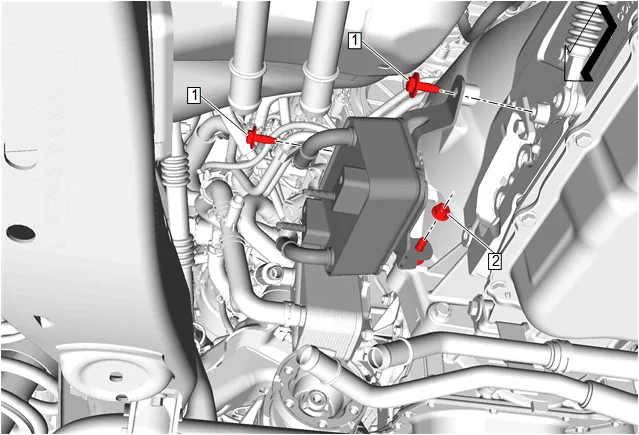
- Automatic Transmission Fluid Cooling Exchanger Nut (2) » Remove
- Automatic Transmission Fluid Cooling Exchanger Bolt (1) » Remove [2x]
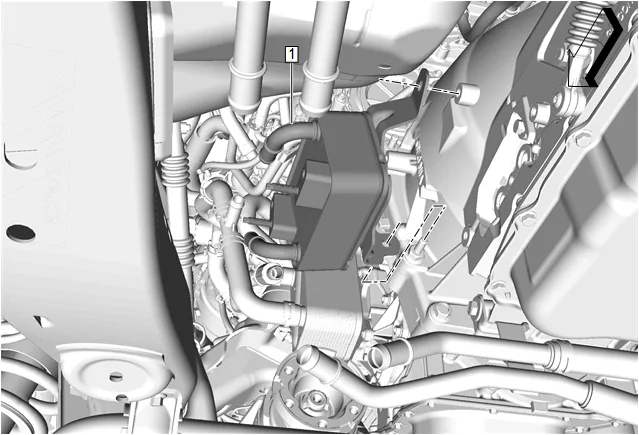
- Automatic Transmission Fluid Cooling Exchanger (1) » Remove
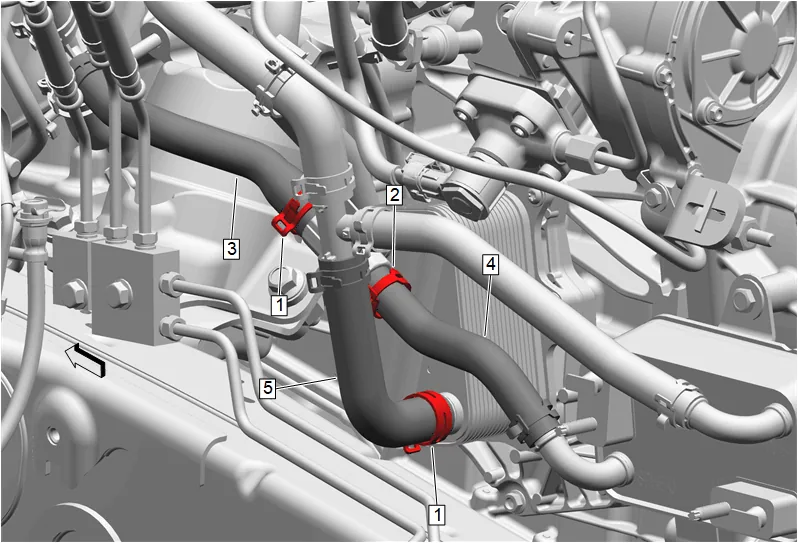
- Thermostat Bypass Hose Clamp (1) » Disengage [2x] — Hose Clamp Replacement Guidelines
- Spring Type
- Engine Oil Cooler Coolant Inlet Hose Clamp (2) » Disengage — Hose Clamp Replacement Guidelines - Spring Type
- Engine Oil Cooler Coolant Outlet Hose (3) @ Engine Oil Cooler » Remove
- Automatic Transmission Fluid Cooling Heat Exchanger Outlet Hose (4) @ Engine Oil Cooler » Remove
- Engine Oil Cooler Coolant Inlet Hose (5) @ Engine Oil Cooler » Remove
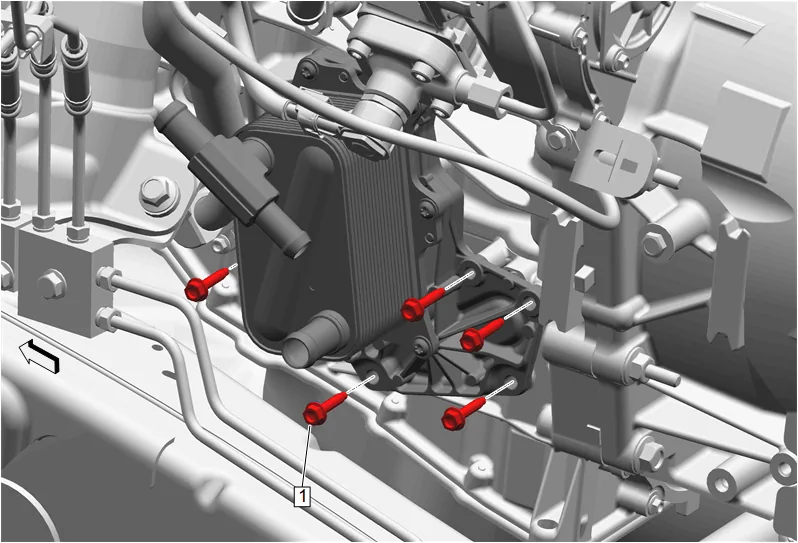
- Engine Oil Cooler Bolt (1) » Remove [5x]
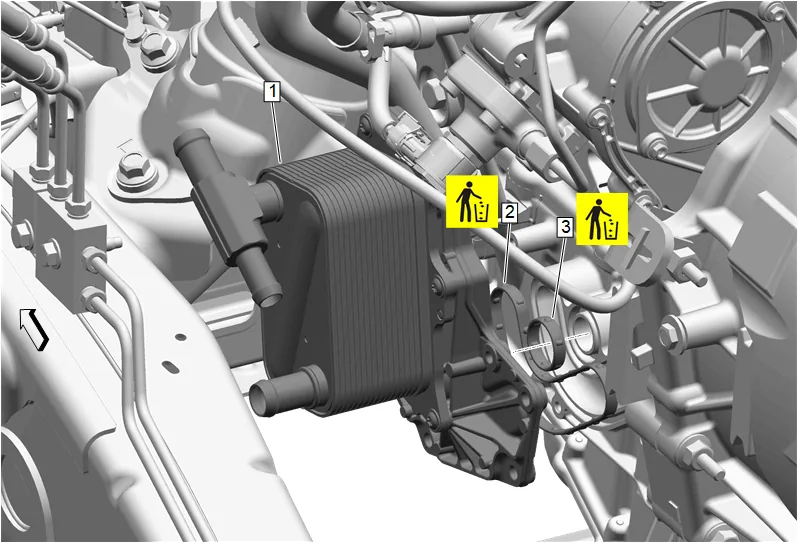
- Engine Oil Cooler » (1) Remove
- Engine Oil Cooler Gasket (2) » Remove and DISCARD
- Engine Oil Cooler Gasket (3) » Remove and DISCARD
- Detach engine coolant heater cord retainers and position aside as necessary.
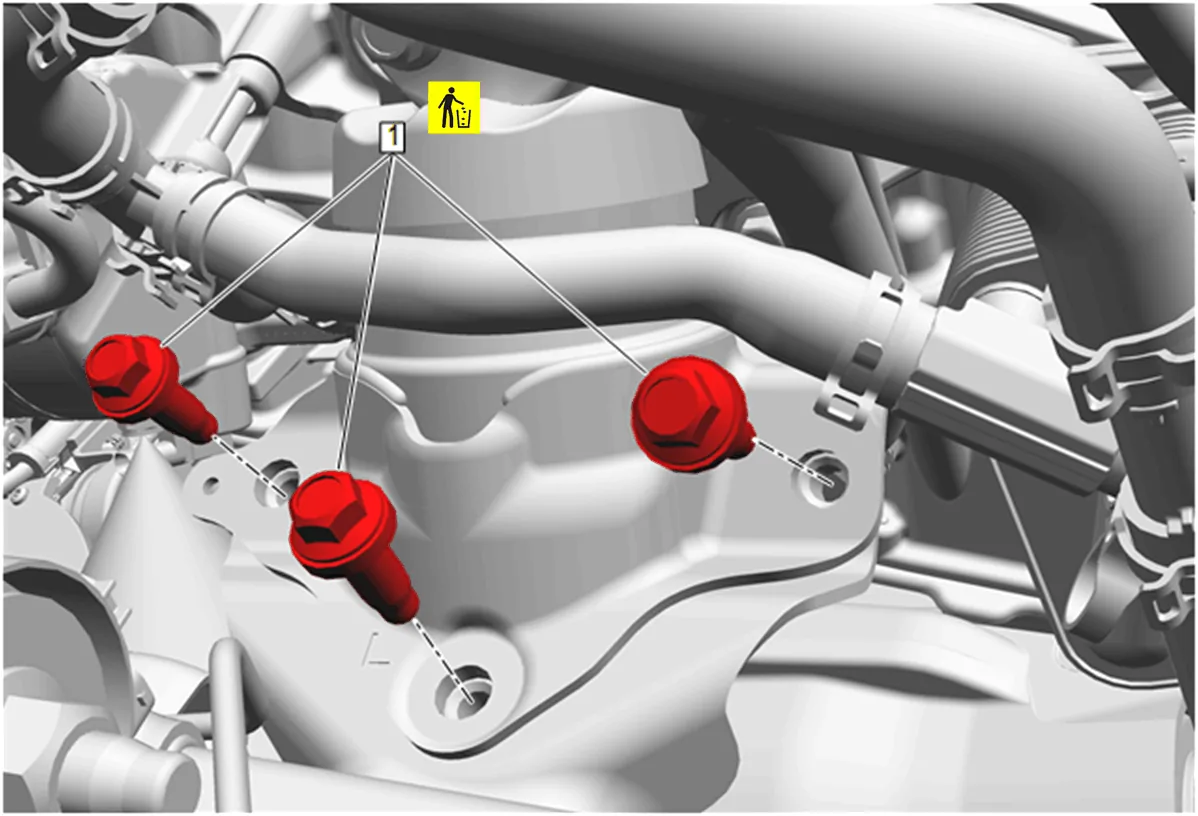
- Wiring Harness Retainer » Release
- Working through the wheelhouse opening remove and DISCARD the 3 engine mount frame side bolts (1).
- Raise the engine with a suitable lifting device to remove the engine mount.
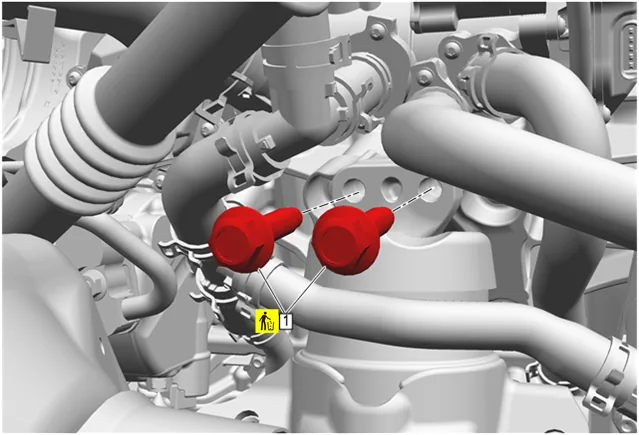
- Remove and DISCARD the 2 engine mount engine side bolts (1).
- If equipped, disconnect electrical connector at the rear of engine mount.
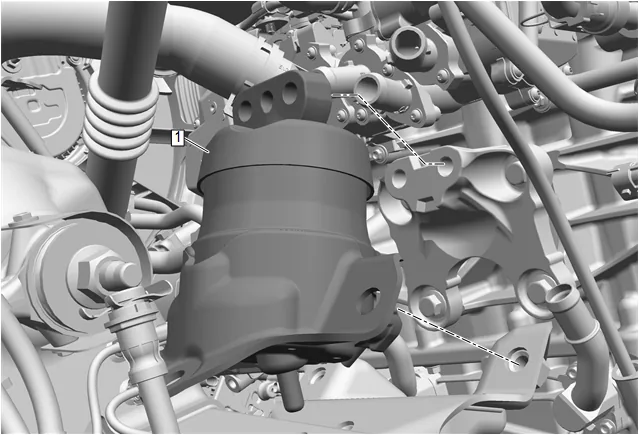
- Engine Mount (1) » Remove
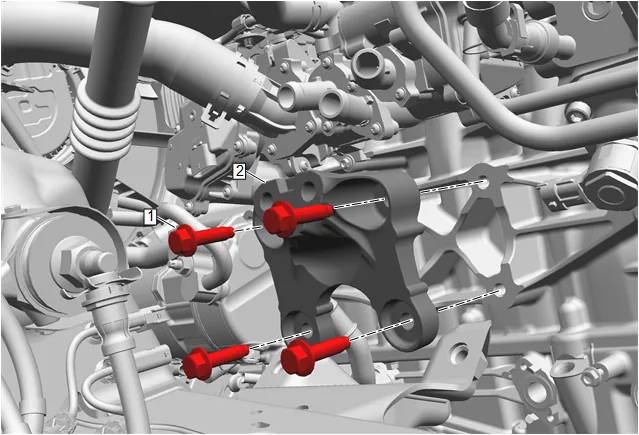
- Engine Mount Bracket Bolt (1) » Remove [4x]
- Engine Mount Bracket (2) » Remove Cleaning and Inspection Procedure - Conditional
-
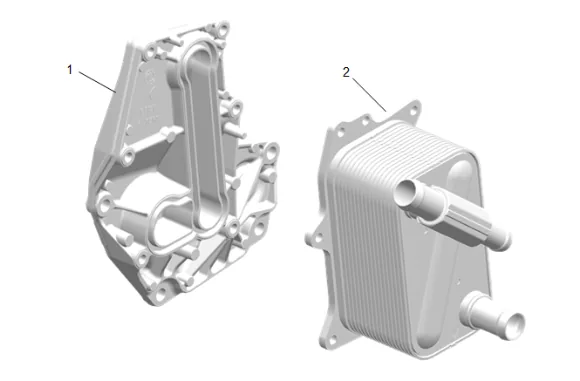
Clean the engine oil cooler (1,2).
-
Inspect the engine oil cooler (1,2).
-
Replace the engine oil cooler (1,2) if any damage is found. Installation Procedure
-
Engine Mount Bracket (2) » Install
-
Engine Mount Bracket Bolt (1) » Install and tighten [4x] — Fastener Specifications
-
Engine Mount (1) » Install
-
If equipped, connect electrical connector at the rear of engine mount.
-
If a NEW threaded component is being installed, loosen the adhesive using a metal pick or similar tool before proceeding. If threaded component is reused, prepare the threaded component using the following steps: 5.1. Remove any loose cured adhesive from the external threads of the component using a lint free cloth. 5.2. Thread the cleaned component into the internal mating threads and remove to loosen trapped cured adhesive. 5.3. Apply thread locking adhesive to the external threads of the component. Adhesives, Fluids, Lubricants, and Sealers 5.4. Ensure there are no gaps in the thread locking adhesive once applied to the component.
-
Install and tighten the 2 NEW engine mount engine side bolts (1). Fastener Specifications
-
Lower the engine.
-
If a NEW threaded component is being installed, loosen the adhesive using a metal pick or similar tool before proceeding. If threaded component is reused, prepare the threaded component using the following steps: 8.1. Remove any loose cured adhesive from the external threads of the component using a lint free cloth. 8.2. Thread the cleaned component into the internal mating threads and remove to loosen trapped cured adhesive. 8.3. Apply thread locking adhesive to the external threads of the component. Adhesives, Fluids, Lubricants, and Sealers 8.4. Ensure there are no gaps in the thread locking adhesive once applied to the component.
-
Install and tighten the 3 NEW engine mount frame side bolts (1). Fastener Specifications
-
Wiring Harness Retainer » Install
-
Engine Oil Cooler Gasket (2) » Install NEW
-
Engine Oil Cooler Gasket (3) » Install NEW
-
Engine Oil Cooler (1) » Install
-
Engine Oil Cooler Bolt (1) » Install and tighten [5x] — Fastener Specifications
-
Engine Oil Cooler Coolant Inlet Hose (5) @ Engine Oil Cooler » Install
-
Automatic Transmission Fluid Cooling Heat Exchanger Outlet Hose (4) @ Engine Oil Cooler » Install
-
Engine Oil Cooler Coolant Outlet Hose (3) @ Engine Oil Cooler » Install
-
Engine Oil Cooler Coolant Inlet Hose Clamp (2) » Engage — Hose Clamp Replacement Guidelines - Spring Type
-
Thermostat Bypass Hose Clamp (1) » Engage [2x] — Hose Clamp Replacement Guidelines - Spring Type
-
Automatic Transmission Fluid Cooling Exchanger (1) » Install
-
Automatic Transmission Fluid Cooling Exchanger Bolt (1) » Install and tighten [2x] — Fastener Specifications
-
Automatic Transmission Fluid Cooling Exchanger Nut (2) » Install and tighten — Fastener Specifications
-
Remove the caps from the fittings and plugs from the holes before installing the transmission fluid cooler pipes.
-
Transmission Fluid Cooler Seal (2) » Install NEW
-
Transmission Fluid Cooler Pipe Seal (3) » Install NEW [2x]
-
Transmission Fluid Cooler Pipe (1) » Install
-
Transmission Fluid Cooler Pipe Bolt (2) » Install and tighten — Fastener Specifications
-
Transmission Fluid Cooler Pipe Nut (1) » Install and tighten [2x] — Fastener Specifications
-
Fuel Heater Inlet and Outlet Bolt (3) » Install and tighten — Fastener Specifications
-
Automatic Transmission Fluid Cooling Heat Exchanger Inlet Hose (2) » Install
-
Automatic Transmission Fluid Cooling Heat Exchanger Inlet Hose Clamp (1) » Engage [2x] — Hose Clamp Replacement Guidelines - Spring Type
-
Automatic Transmission Fluid Cooling Heat Exchanger Outlet Hose (2) » Install
-
Automatic Transmission Fluid Cooling Heat Exchanger Outlet Hose Clamp (1) » Engage [2x] — Hose Clamp Replacement Guidelines - Spring Type
-
Remove the drain pan.
-
Front Wheelhouse Liner - Left Side » Install — Front Wheelhouse Liner Replacement
-
Remove the lifting device.
-
Remove the EN-51768 Engine Support Fixture Adaptor Bolt - M8 and the EN-36857 Engine Lift Bracket (1) from the front of the left side cylinder head.
-
Turbocharger Coolant Feed and Return Pipe Gasket - Left Side Upper (1) » Install NEW
-
Engine Coolant Air Bleed Pipe Bolt - Left Side Upper (1) » Install and tighten — Fastener Specifications
-
{ If equipped } Ground Cable (2) » Install
-
{ If equipped } Engine Wiring Harness Ground Bolt (1) » Install and tighten — Ground Repair
-
Install the fuel injector wiring harness connector (1) to the engine coolant air bleed bracket.
-
Position the engine wiring harness channel (3) to the front of the engine.
-
Engine Wiring Harness Bracket Bolt (2) » Install and tighten — Fastener Specifications
-
Engine Wiring Harness Bracket Nut (1) » Install and tighten [2x] — Fastener Specifications
-
Oil Filler Cap » Remove
-
Intake Manifold Cover (2) » Install
-
Intake Manifold Cover Bolt (1) » Install and tighten — Fastener Specifications
-
Oil Filler Cap » Install
-
Fill the cooling system. Cooling System Draining and Filling
-
Fill the engine oil to the proper level with NEW engine oil. Engine Oil and Oil Filter Replacement
-
Check the transmission fluid level. Transmission Fluid Level and Condition Check