Transfer Case Rear Half Cleaning and Inspection
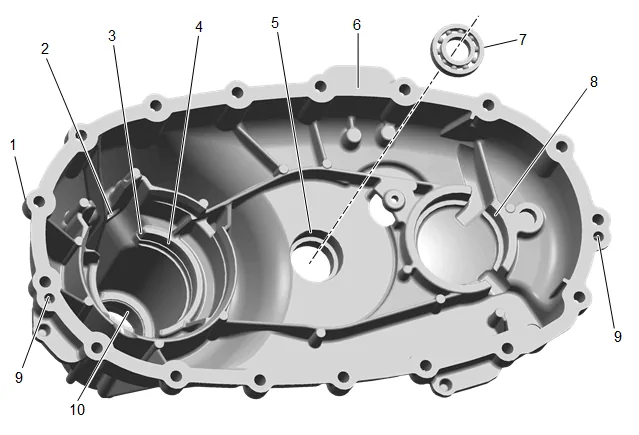
- Inspect all components or sub-components and perform any repair procedure necessary to fix the damage. If the damage cannot be repaired, replace the component or sub-component as indicated.
- Clean the rear case half in cleaning solvent and air dry.
- Clean all sealing surfaces.
- Transfer Case Rear Case Half (1) » Inspect for damage If damaged, replace the component.
- Inspect the transfer case access hole plug (2).
- Inspect the transfer case rear output shaft rear bearing outer retaining ring groove (3). Replace the rear case half assembly if the groove is worn.
- Transfer Case Rear Output Shaft Bearing Bore (4) » Replace the rear case half assembly if a bearing has spun or if cracks are detected.
- Transfer Case Four Wheel Drive Actuator Lever Shaft Bearing Bore (5) » Replace the front case half assembly if a bearing has spun or if cracks are detected.
- Inspect the case sealing surface (6). Repair small scratches or nicks with a soft stone.
- Transfer Case Four Wheel Drive Actuator Lever Shaft Bearing (7) » Replace the bearing if roughness, brinelling, or pitting is detected. Transfer Case Four Wheel Drive Actuator Lever Shaft Bearing Replacement - Rear
- Transfer Case Rear Output Shaft Bearing Bore (8) » Replace the rear case half assembly if a bearing has spun or if cracks are detected.
- Inspect the transfer case locating pin hole (9). Replace the rear case half assembly if the locating pin holes are out of round or damaged.
- Transfer Case Rear Output Shaft Bushing (10) 13.1. Replace the bushing if it is damaged or worn. 13.2. If the bushing is removed, inspect the bushing bore for signs of spinning. Replace the rear case half assembly if the bushing has spun.