Air Conditioning Condenser Replacement (LM2)
Single Use Fasteners and Components Air Conditioning Compressor and Condenser Hose Seal - Large Air Conditioning Compressor and Condenser Hose Seal - Small Transmission Fluid Cooler Seal [2x] Removal Procedure
- Disconnect the battery negative cable. Battery Negative Cable Disconnection and Connection
- Recover the refrigerant. Refrigerant Recovery and Recharging
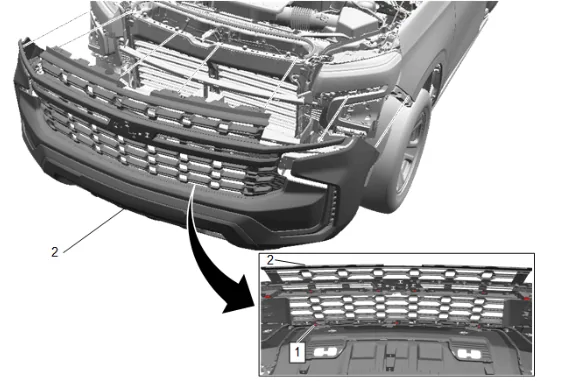
- Front Bumper Fascia (2) » Remove — Front Bumper Fascia Removal and Installation
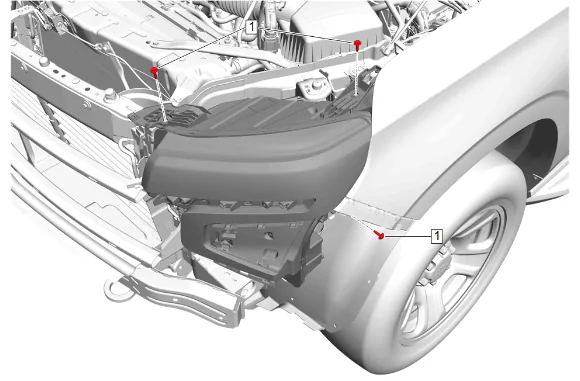
- Headlamp Bolt - Left Side and Right Side (1) » Remove [6x]
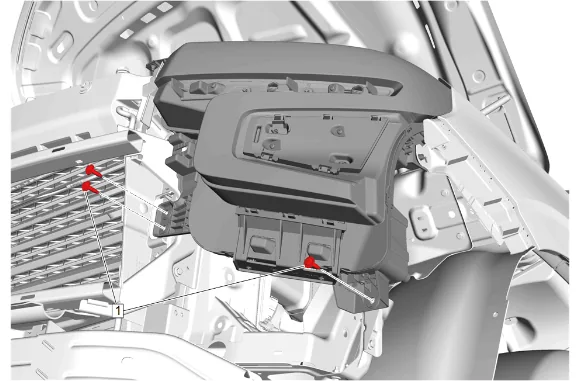
- Headlamp Bolt - Left Side and Right Side (1) » Remove [6x]
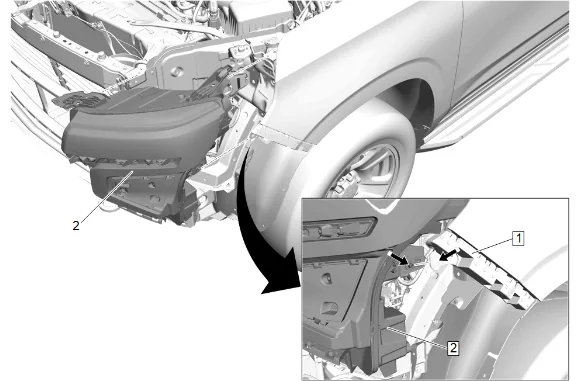
- Release the front headlamp guide pin from the front bumper fascia guide (1).
- Front Headlamp - Left Side and Right Side (2) » Remove [2x]
- Release the wiring harness retaining tab.
- Disconnect the electrical connectors.
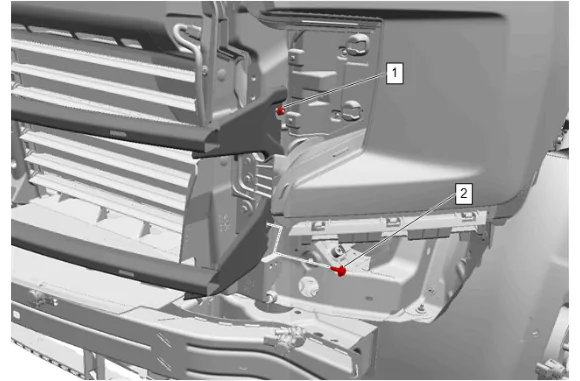
- Front Bumper Fascia Upper Stiffener Nut - Left Side and Right Side (1) » Loosen [2x]
- Front Bumper Fascia Upper Stiffener Bolt - Left Side and Right Side (2) » Remove [2x]
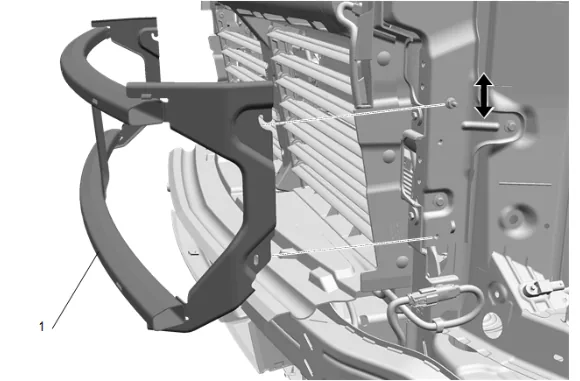
- Pull the front bumper fascia upper stiffener (1) up and out over the stud.
- Disconnect the electrical connector and reposition wiring harness.
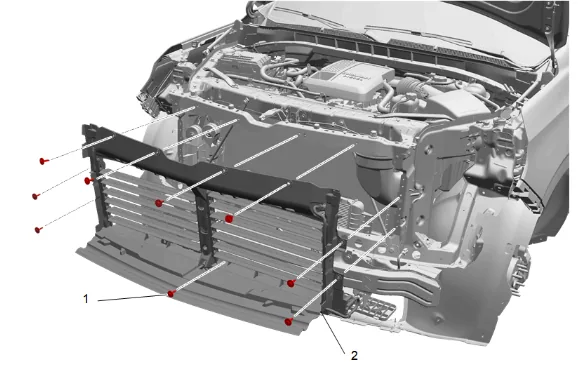
- Front Bumper Shutter Bolt (1) » Remove [9x]
- Front Bumper Shutter (2) » Remove
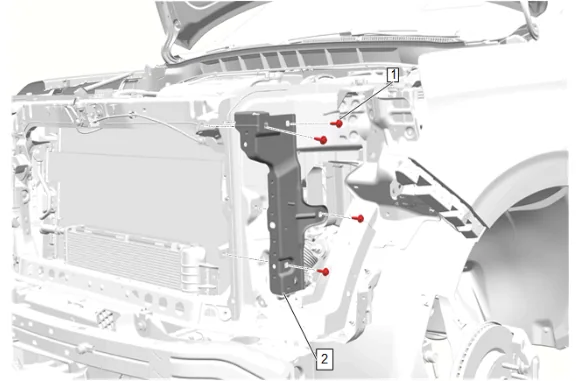
- Front End Upper Tie Bar Bolt - Left Side and Right Side (1) @ Headlamp Bracket » Remove [8x]
- Headlamp Bracket - Left Side and Right Side (2) » Remove [2x]
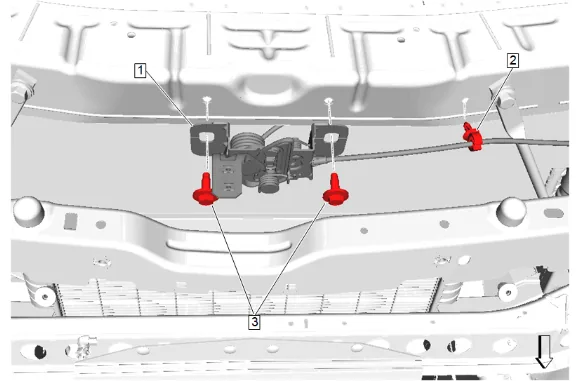
- Hood Primary Latch Release Cable Clip (2) » Remove
- Disconnect and unclip the electrical connector.
- Mark the location of the hood primary latch (1) for proper installation.
- Hood Primary and Secondary Latch Bolt (3) » Remove [2x]
- Hood Primary Latch (1) » Reposition
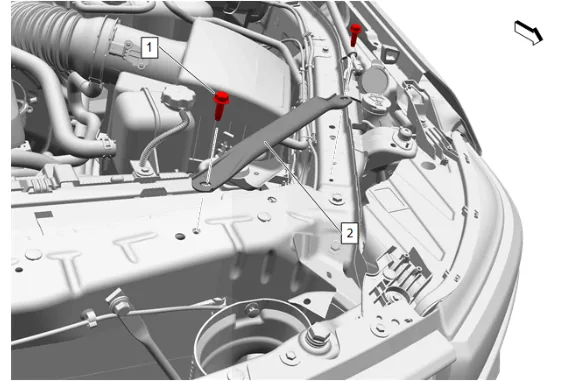
- Front End Sheet Metal Diagonal Brace Bolt - Left Side and Right Side (1) » Remove [4x]
- Front End Sheet Metal Diagonal Brace - Left Side and Right Side (2) » Remove [2x]
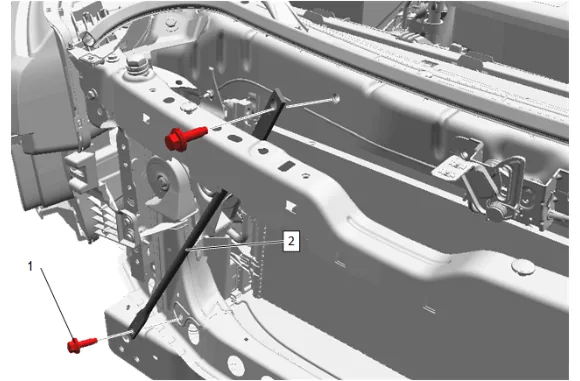
- Remove the 2 left and 2 right side front end sheet metal diagonal brace bolts (1).
- Remove the left and right side front end sheet metal diagonal braces (2).
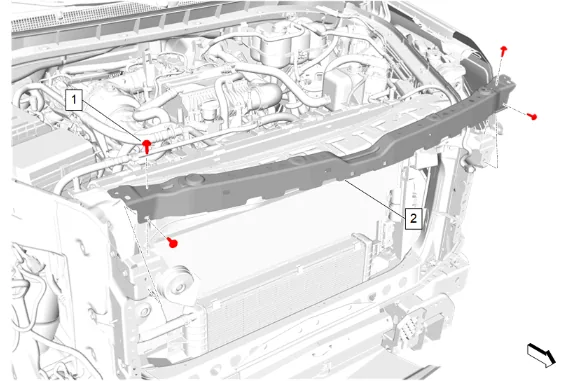
- Front Grille Support Bracket Bolt (1) » Remove [4x]
- Front Grille Support Reinforcement (2) » Remove
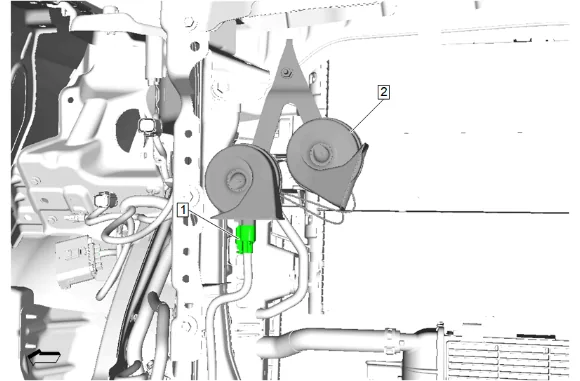
- Electrical Connector (1) @ Horn (2) » Disconnect
- Unclip and reposition the wiring harness away from the front end upper tie bar.
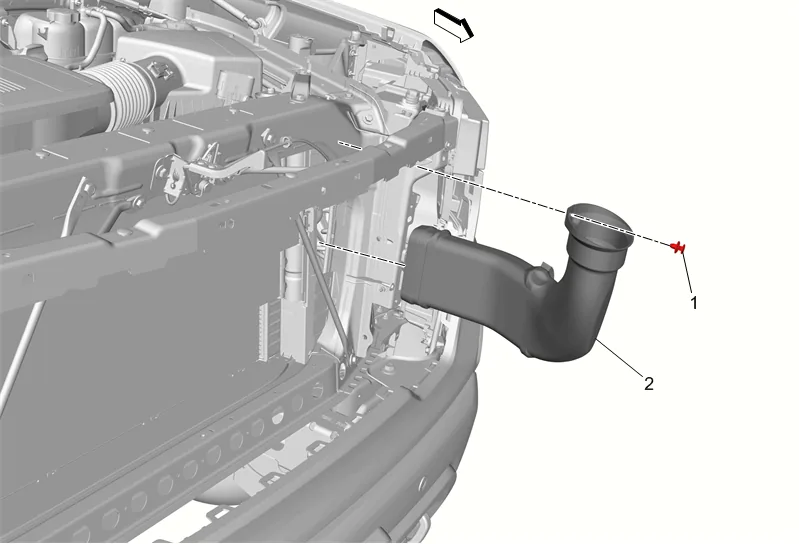
- Intake Air Duct Retainer (1) » Remove
- Intake Air Duct (2) » Remove
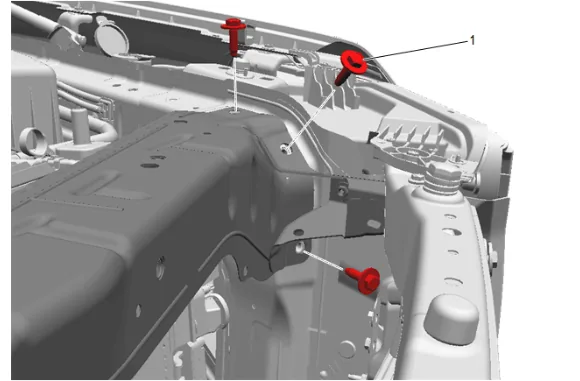
- Front End Upper Tie Bar Bolt (1) » Remove [3x]
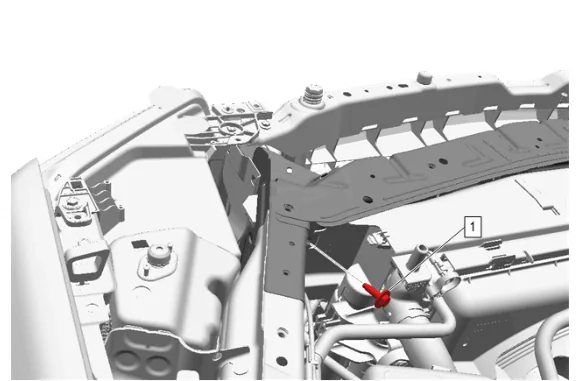
- Front End Upper Tie Bar Bolt (1) » Remove
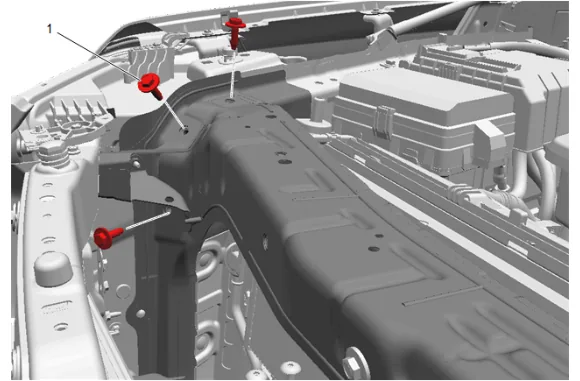
- Front End Upper Tie Bar Bolt (1) » Remove [3x]
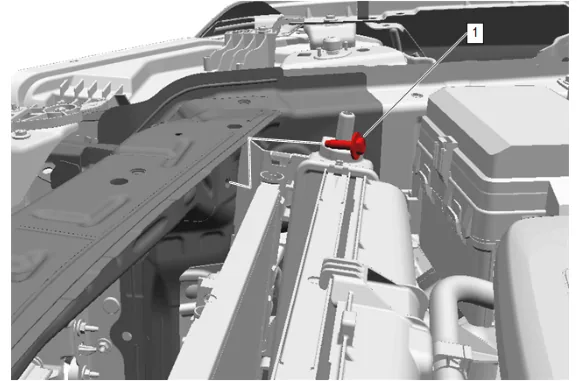
- Front End Upper Tie Bar Bolt (1) » Remove
- Disconnect the wiring harness retainers and reposition the harness as necessary.
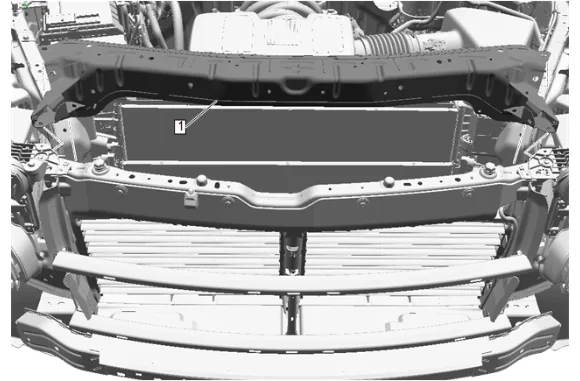
- Front End Upper Tie Bar (1) » Remove
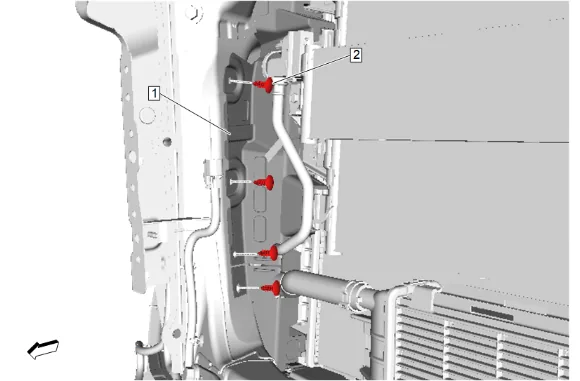
- Radiator Air Side Baffle Retainer (2) » Remove [4x]
- Radiator Air Side Baffle (1) » Reposition
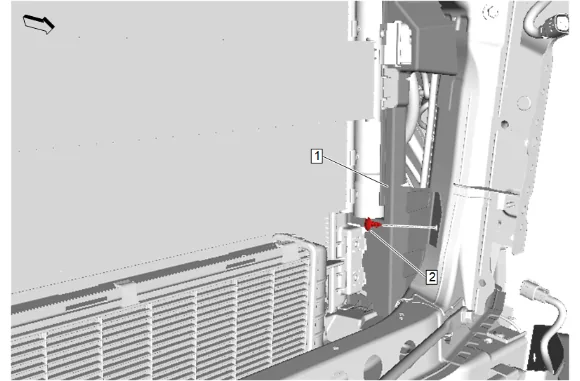
- Radiator Air Side Baffle Retainer (2) » Remove
- Radiator Air Side Baffle (1) » Reposition
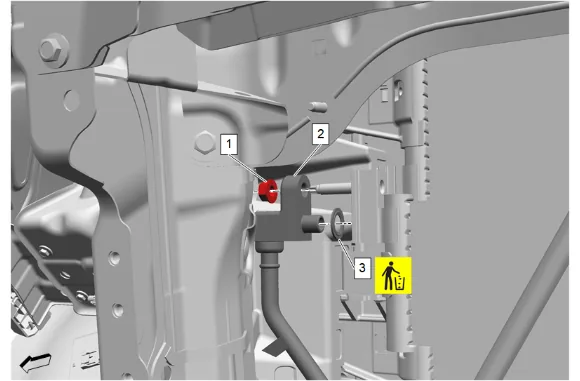
- Transmission Fluid Cooler Pipe Nut (1) » Remove
- Transmission Fluid Cooler Inlet and Outlet Pipe (2) @ Transmission Fluid Auxiliary Cooler - Right Side » Remove
- Transmission Fluid Cooler Seal (3) » Remove and DISCARD
- Reposition the left radiator air side baffle as necessary for access.
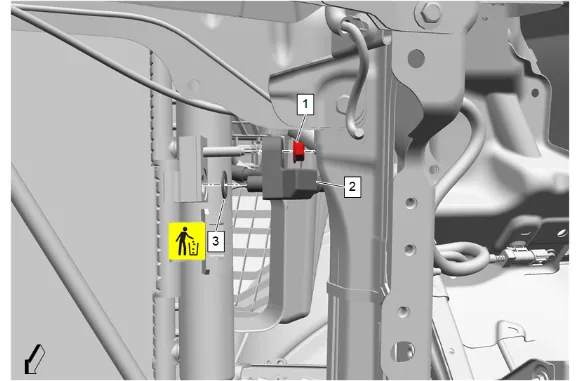
- Transmission Fluid Cooler Pipe Nut (1) » Remove
- Transmission Fluid Cooler Inlet and Outlet Pipe (2) @ Transmission Fluid Auxiliary Cooler - Left Side » Remove
- Transmission Fluid Cooler Seal (3) » Remove and DISCARD
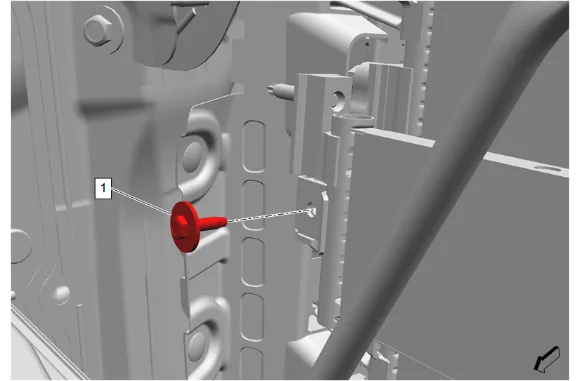
- Transmission Fluid Auxiliary Cooler Bracket Bolt (1) » Remove
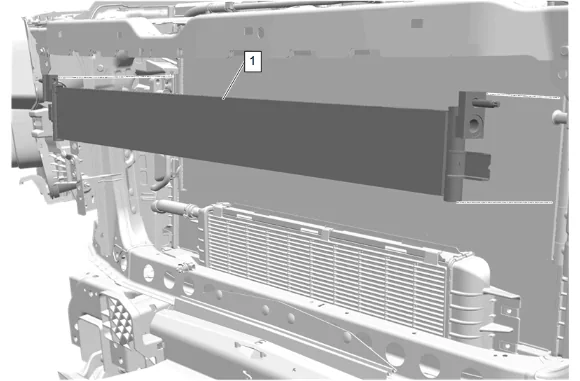
- Transmission Fluid Auxiliary Cooler (1) » Remove
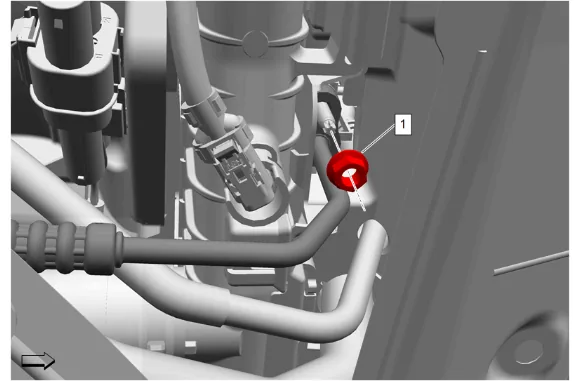
- Air Conditioning Condenser and Evaporator Hose Nut (1) » Remove
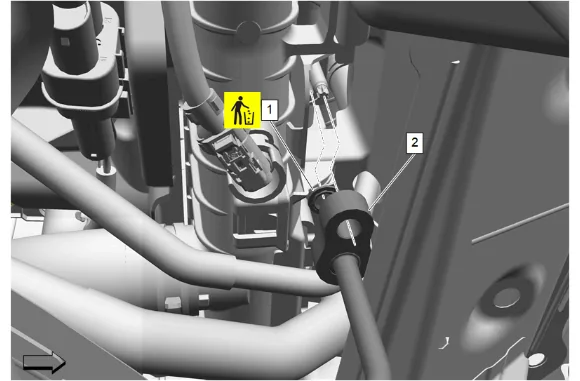
- Air Conditioning Condenser and Evaporator Hose (2) » Remove
- Air Conditioning Compressor and Condenser Hose Seal (1) » Remove and DISCARD
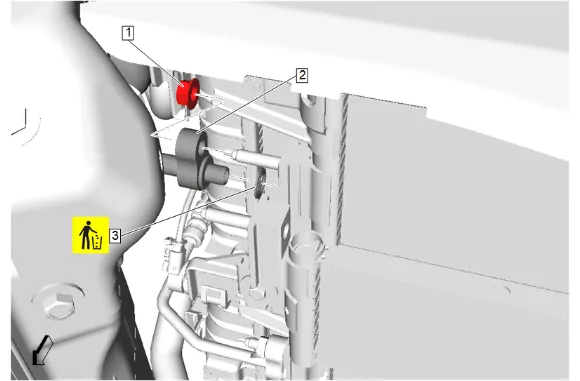
- Air Conditioning Compressor and Condenser Hose Nut (1) » Remove
- Air Conditioning Compressor and Condenser Hose (2) » Remove
- Air Conditioning Compressor and Condenser Hose Seal (3) » Remove and DISCARD
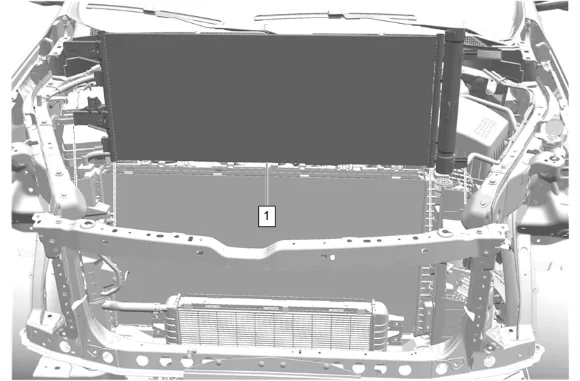
-
Manipulate the air conditioning condenser (1) out of the vehicle. Installation Procedure
-
Air Conditioning Condenser (1) » Install
- Air Conditioning Compressor and Condenser Hose Seal (3) » Install NEW
- Air Conditioning Compressor and Condenser Hose (2) » Install
- Air Conditioning Compressor and Condenser Hose Nut (1) » Install and tighten — Fastener Specifications
-
Air Conditioning Compressor and Condenser Hose Seal (1) » Install NEW
-
Air Conditioning Condenser and Evaporator Hose (2) » Install
-
Air Conditioning Condenser and Evaporator Hose Nut (1) » Install and tighten — Fastener Specifications
-
Reposition the left radiator air side baffle as necessary for access.
-
Transmission Fluid Auxiliary Cooler (1) » Install
-
Transmission Fluid Auxiliary Cooler Bracket Bolt (1) » Install and tighten — Fastener Specifications
-
Transmission Fluid Cooler Seal (3) » Install NEW
-
Transmission Fluid Cooler Inlet and Outlet Pipe (2) @ Transmission Fluid Auxiliary Cooler - Left Side » Install
-
Transmission Fluid Cooler Pipe Nut (1) » Install and tighten — Fastener Specifications
-
Transmission Fluid Cooler Seal (3) » Install NEW
-
Transmission Fluid Cooler Inlet and Outlet Pipe (2) @ Transmission Fluid Auxiliary Cooler - Right Side » Install
-
Transmission Fluid Cooler Pipe Nut (1) » Install and tighten — Fastener Specifications
-
Radiator Air Side Baffle (1) » Move into position
-
Radiator Air Side Baffle Retainer (2) » Install
-
Radiator Air Side Baffle (1) » Move into position
-
Radiator Air Side Baffle Retainer (2) » Install [4x]
-
Front End Upper Tie Bar (1) » Install
-
Install the wiring harness.
-
Front End Upper Tie Bar Bolt (1) » Install and tighten — Fastener Specifications
-
Front End Upper Tie Bar Bolt (1) » Install and tighten [3x] — Fastener Specifications
-
Front End Upper Tie Bar Bolt (1) » Install and tighten — Fastener Specifications
-
Front End Upper Tie Bar Bolt (1) » Install and tighten [3x] — Fastener Specifications
-
Intake Air Duct (2) » Install
-
Intake Air Duct Retainer (1) » Install
-
Move the wiring harness into position and clip to the front end upper tie bar.
-
Electrical Connector (1) @ Horn (2) » Connect
-
Front Grille Support Reinforcement (2) » Install
-
Front Grille Support Bracket Bolt (1) » Install and tighten [4x] — Fastener Specifications
- Install the left and right side front end sheet metal diagonal braces (2).
- If NEW threaded components are being installed, loosen the adhesive using a metal pick or similar tool before proceeding. If threaded components are reused, prepare the threaded components using the following steps: 34.1. Remove any loose cured adhesive from the external threads of the components using a lint free cloth. 34.2. Thread the cleaned components into the internal mating threads and remove to loosen trapped cured adhesive. 34.3. Apply thread locking adhesive to the external threads of the components. Adhesives, Fluids, Lubricants, and Sealers 34.4. Ensure there are no gaps in the thread locking adhesive once applied to the component.
- Install and tighten the 2 left and 2 right side front end sheet metal diagonal brace bolts (1). Fastener Specifications
-
Install the left and right side front end sheet metal diagonal braces (2).
-
If NEW threaded components are being installed, loosen the adhesive using a metal pick or similar tool before proceeding. If threaded components are reused, prepare the threaded components using the following steps: 37.1. Remove any loose cured adhesive from the external threads of the components using a lint free cloth. 37.2. Thread the cleaned components into the internal mating threads and remove to loosen trapped cured adhesive. 37.3. Apply thread locking adhesive to the external threads of the components. Adhesives, Fluids, Lubricants, and Sealers 37.4. Ensure there are no gaps in the thread locking adhesive once applied to the component.
-
Install and tighten the 2 left and 2 right side front end sheet metal diagonal brace bolts (1). Fastener Specifications
-
Hood Primary Latch (1) » Move into position
-
Align the hood primary latch (1) with the marks made during removal.
-
Hood Primary and Secondary Latch Bolt (3) » Install and tighten [2x] — Fastener Specifications
-
Connect the electrical connector and clip in place.
-
Hood Primary Latch Release Cable Clip (2) » Install
-
Headlamp Bracket - Left Side and Right Side (2) » Install [2x]
-
Front End Upper Tie Bar Bolt - Left Side and Right Side (1) @ Headlamp Bracket » Install and tighten [8x] — Fastener Specifications
-
Front Bumper Shutter (2) » Install
-
Front Bumper Shutter Bolt (1) » Install and tighten [9x] — Fastener Specifications
-
Connect the electrical connectors and install wiring harness.
-
Front Bumper Fascia Upper Stiffener (1) » Install
- Front Bumper Fascia Upper Stiffener Bolt - Left Side and Right Side (2) » Install and tighten [2x] — Fastener Specifications
- Front Bumper Fascia Upper Stiffener Nut - Left Side and Right Side (1) » Tighten [2x] — Fastener Specifications
- Connect the electrical connectors.
- Secure the wiring harness retaining tab.
- Secure the front headlamp guide pin to the front bumper fascia guide (1).
- Front Headlamp - Left Side and Right Side (2) » Install [2x]
- Headlamp Bolt - Left Side and Right Side (1) » Install and tighten [6x] — Fastener Specifications
-
Headlamp Bolt - Left Side and Right Side (1) » Install and tighten [6x] — Fastener Specifications
-
Front Bumper Fascia (2) » Install — Front Bumper Fascia Removal and Installation
-
Connect the battery negative cable. Battery Negative Cable Disconnection and Connection
-
Recharge the refrigerant. Refrigerant Recovery and Recharging
-
Inspect for refrigerant leaks.