Automatic Transmission Turbine Speed Sensor Replacement (LM2)
Automatic Transmission - 10L80 MHS MQC | Repair Instructions - On Vehicle | Document ID: 5910654 Automatic Transmission Turbine Speed Sensor Replacement (LM2) Single Use Fasteners and Components Automatic Transmission Auxiliary Fluid Pump Outlet Pipe Seal Automatic Transmission Auxiliary Fluid Pump Seal Automatic Transmission Fluid Filter Bolt [2x] Automatic Transmission Fluid Pump Seal [2x] Control Valve Solenoid Body Bolt [3x] Removal Procedure
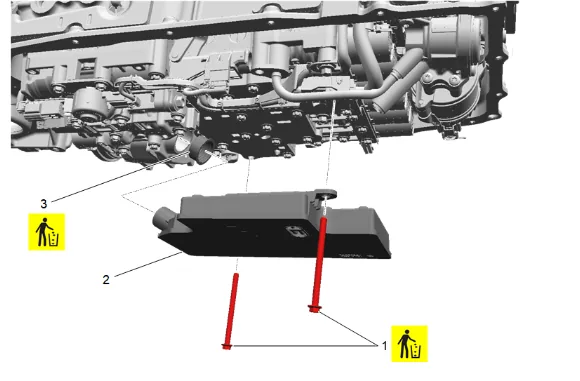
- Automatic Transmission Fluid Filter (2) » Remove — Automatic Transmission Fluid, Fluid Pan and/or Filter Replacement
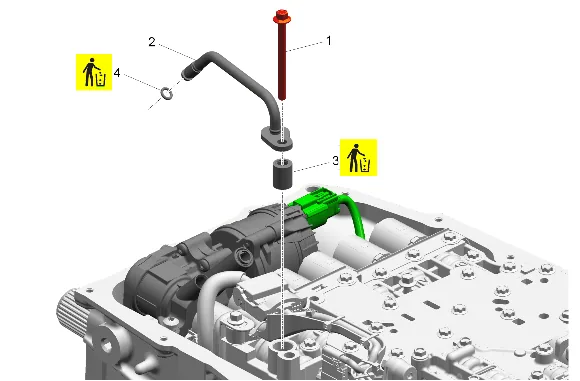
- Control Valve Upper Body Bolt (1) » Remove
- Automatic Transmission Auxiliary Fluid Pump Outlet Pipe (2) » Remove
- Automatic Transmission Auxiliary Fluid Pump Outlet Pipe Seal (3) » Remove and DISCARD
- Automatic Transmission Auxiliary Fluid Pump Seal (4) » Remove and DISCARD
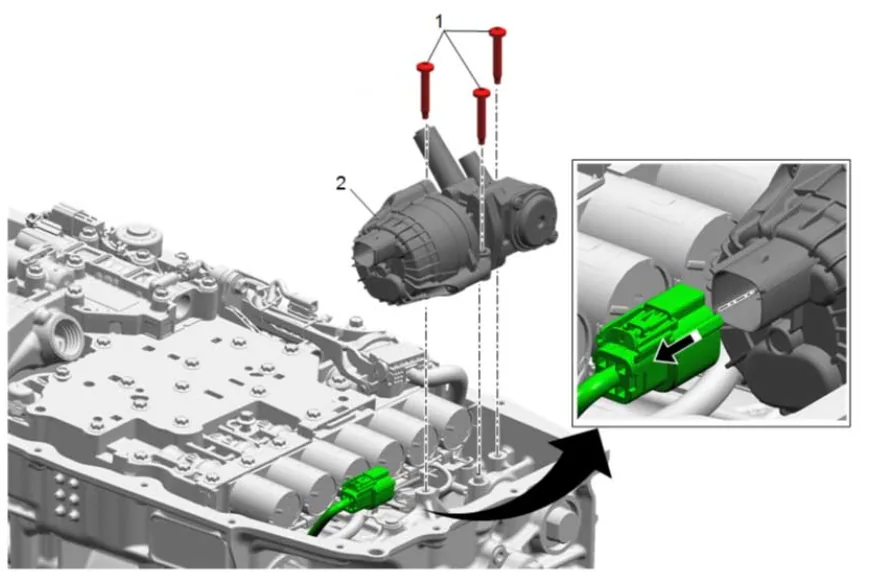
- Automatic Transmission Auxiliary Fluid Pump Bolt (1) » Remove [3x]
- Disconnect the electrical connector.
- Automatic Transmission Auxiliary Fluid Pump (2) » Remove
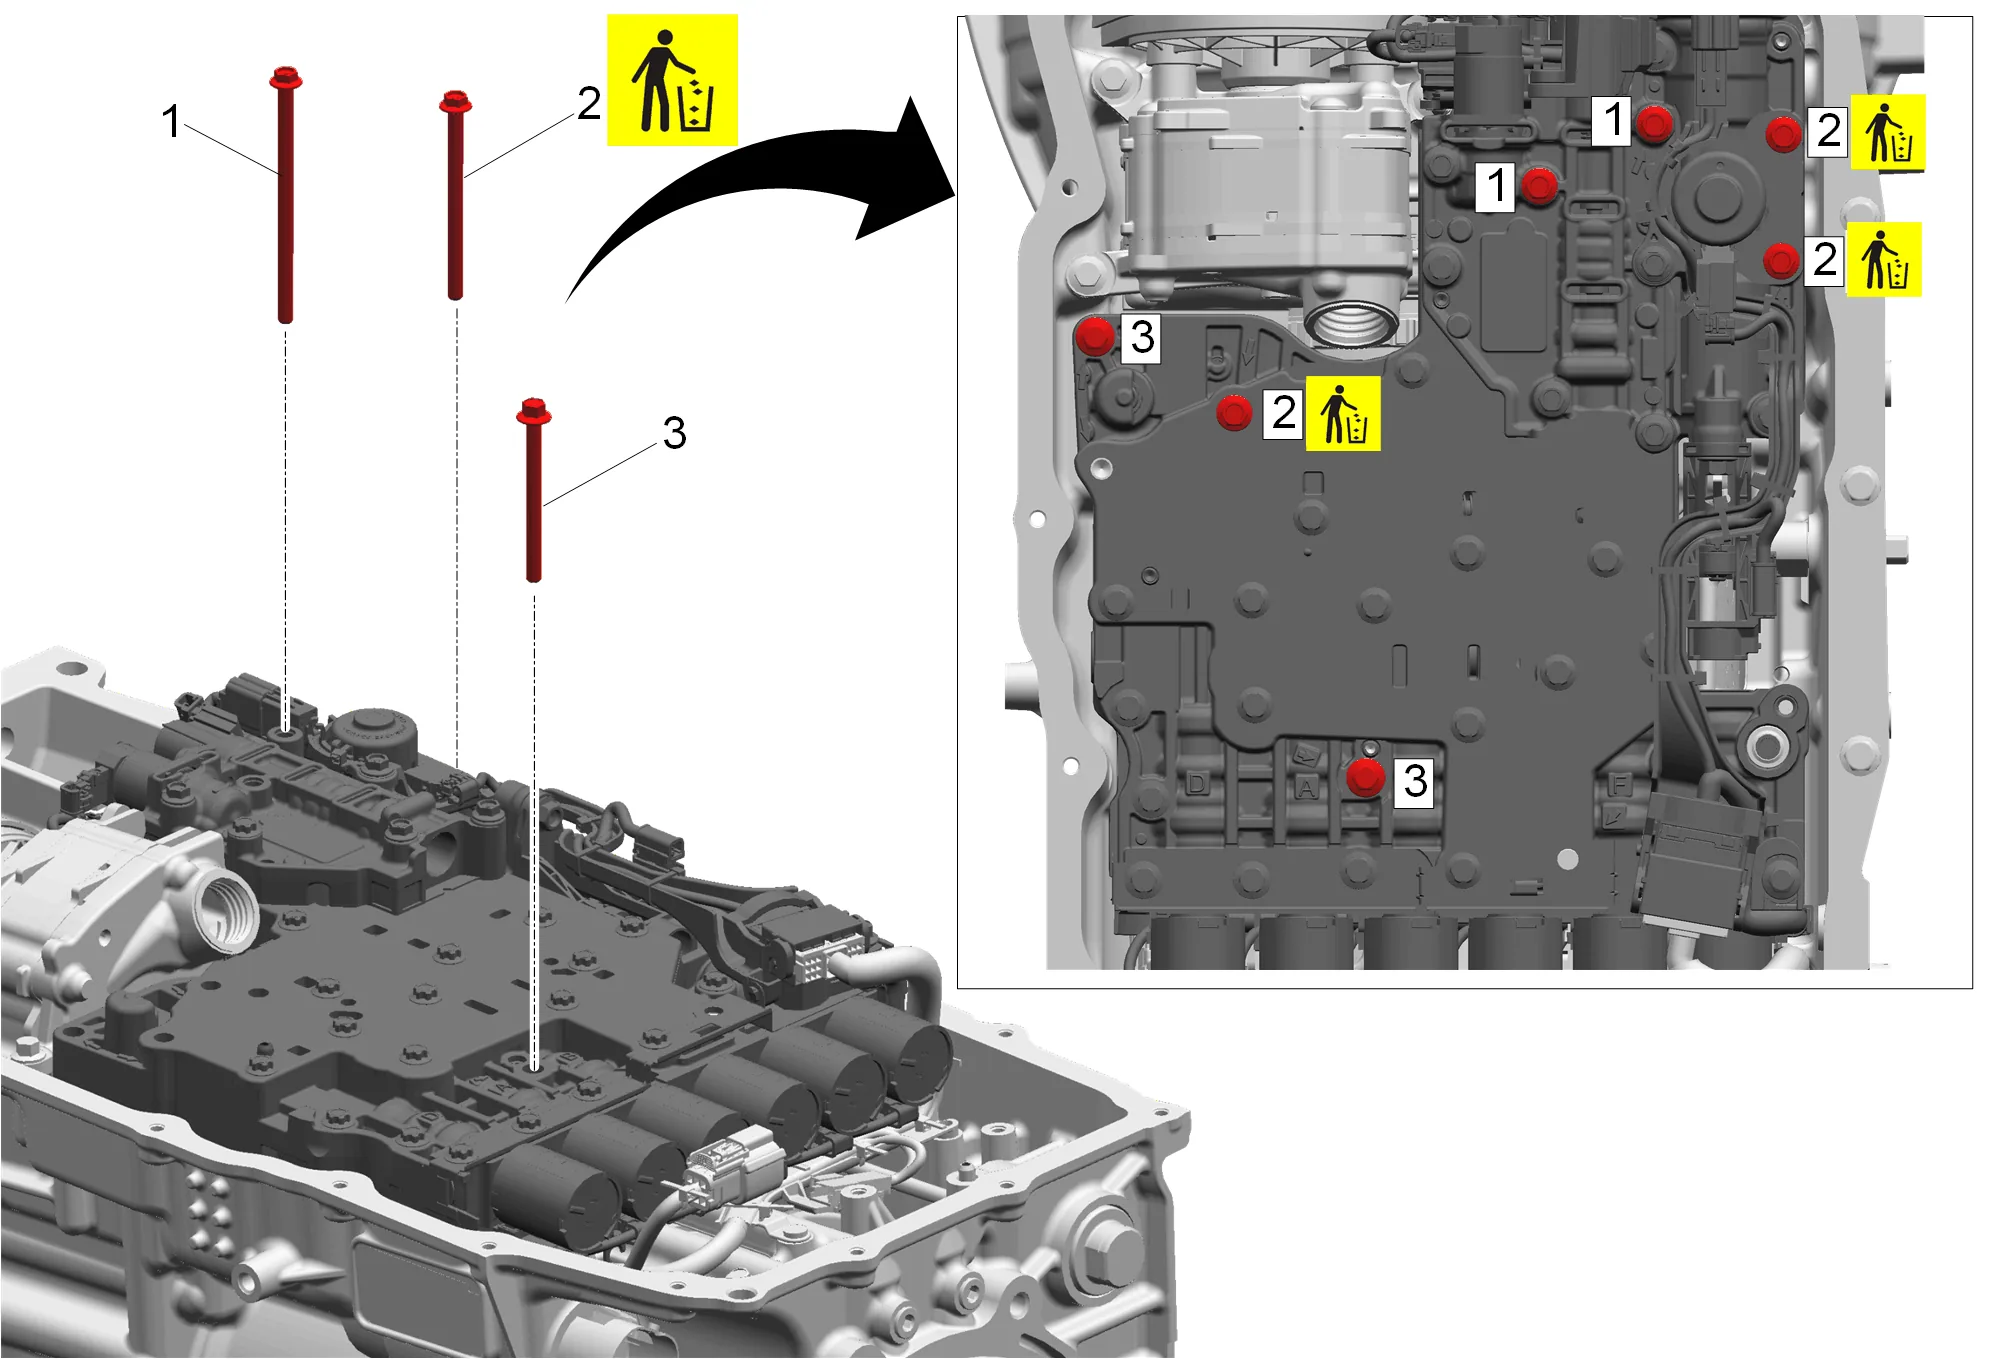
- Control Valve Solenoid Body Bolt (1) » Remove [2x]
- Control Valve Solenoid Body Bolt (2) » Remove and DISCARD [3x]
- Control Valve Solenoid Body Bolt (3) » Remove [2x]
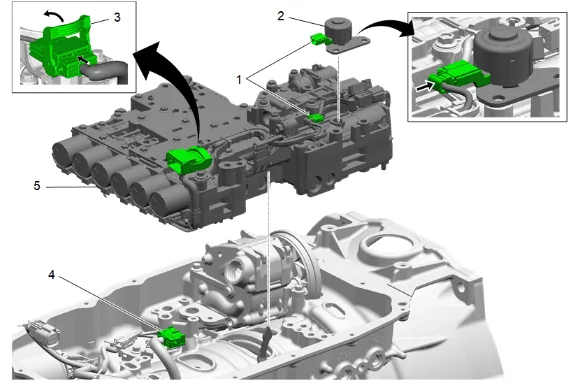
- Disconnect the park inhibitor solenoid electrical connector (1).
- Park Inhibitor Solenoid (2) » Remove
- Unlock the main control wiring harness connector latch (3).
- Disconnect the transmission wiring harness (4).
- Control Valve Body Assembly (5) » Remove
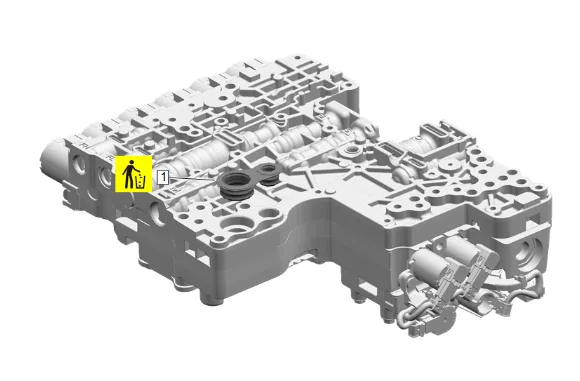
- Automatic Transmission Fluid Pump Seal (1) » Remove and DISCARD
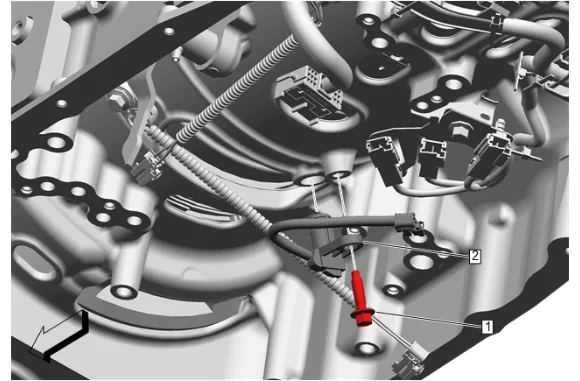
-
Disconnect the automatic transmission turbine speed sensor electrical connector.
-
Automatic Transmission Turbine Speed Sensor Bolt (1) » Remove
-
Automatic Transmission Turbine Speed Sensor (2) » Remove Installation Procedure
-
Automatic Transmission Turbine Speed Sensor (2) » Install
-
Automatic Transmission Turbine Speed Sensor Bolt (1) » Install and tighten — Fastener Specifications
-
Connect the automatic transmission turbine speed sensor electrical connector.
-
Automatic Transmission Fluid Pump Seal (1) » Install NEW
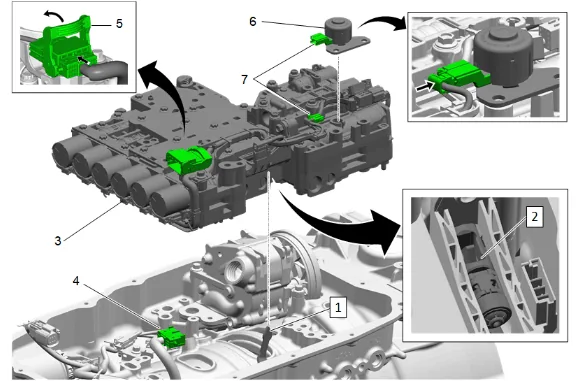
- Place the park pawl actuator (1) in the park position.
- Carefully place the control valve body assembly (3) in the transmission ensuring park pawl actuator lever (1) aligns inside the piston servo opening (2).
- Control Valve Body Assembly (3) » Install
- Connect the main control wiring harness connector (4) then lock the connector latch (5).
- Park Inhibitor Solenoid (6) » Install
- Connect the Park Inhibitor Solenoid connector (7).
- Clean the bolt holes and ensure they are free from old sealant.
- Control Valve Solenoid Body Bolt (1) » Install and tighten in sequence [2x] — Fastener Specifications
- Control Valve Solenoid Body Bolt (2) » Install NEW and tighten in sequence [3x] — Fastener Specifications
- Control Valve Solenoid Body Bolt (3) » Install and tighten in sequence [2x] — Fastener Specifications
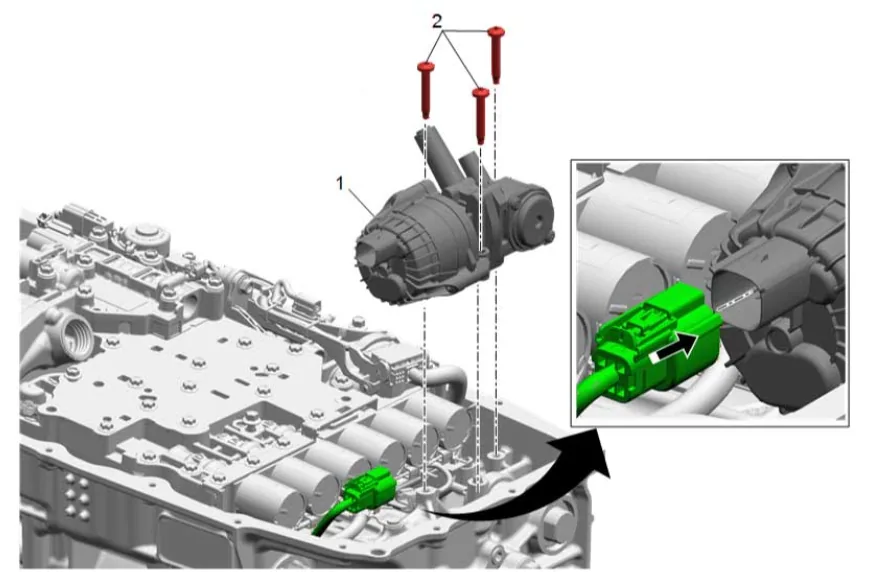
- Automatic Transmission Auxiliary Fluid Pump (1) » Install
- Connect the electrical connector.
- Automatic Transmission Auxiliary Fluid Pump Bolt (2) » Install and tighten [3x] — Fastener Specifications
-
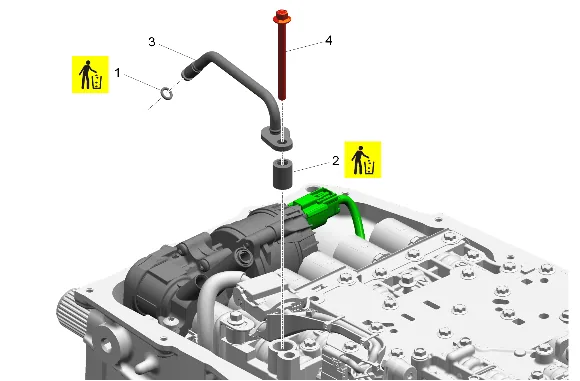
Automatic Transmission Auxiliary Fluid Pump Seal (1) » Install NEW
-
Automatic Transmission Auxiliary Fluid Pump Outlet Pipe Seal (2) » Install NEW
-
Automatic Transmission Auxiliary Fluid Pump Outlet Pipe (3) » Install
-
Control Valve Upper Body Bolt (4) » Install and tighten — Fastener Specifications
-
Automatic Transmission Fluid Filter (2) » Install — Automatic Transmission Fluid, Fluid Pan and/or Filter Replacement
-
Perform the transmission service fast learn procedure. Transmission Service Fast Learn Procedure