Generator and Drive Belt Tensioner Bracket Replacement
Removal Procedure
- Remove the charge air cooler, condenser, fan, and radiator assembly. Charge Air Cooler, Condenser, Fan Motor, and Radiator Assembly Removal and Installation
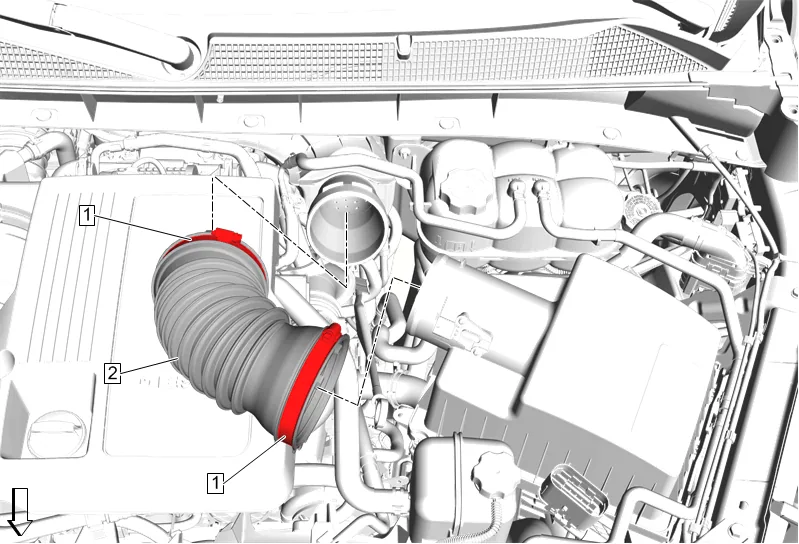
- Air Cleaner Outlet Front Duct Clamp (1) » Loosen [2x]
- Air Cleaner Outlet Front Duct (2) » Remove
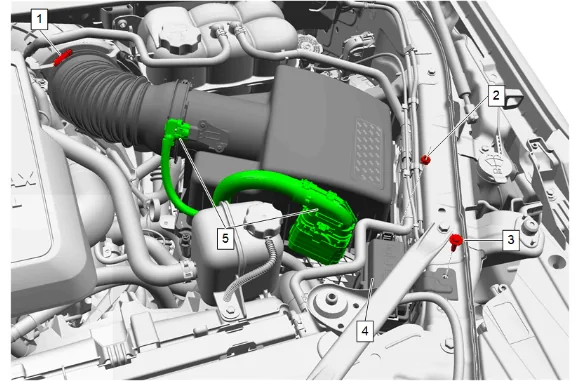
- Air Cleaner Nut (2) » Remove
- Disconnect the 2 electrical connectors (5) from the mass air flow sensor and the air cleaner.
- Remove all wiring harness retainers from the air cleaner.
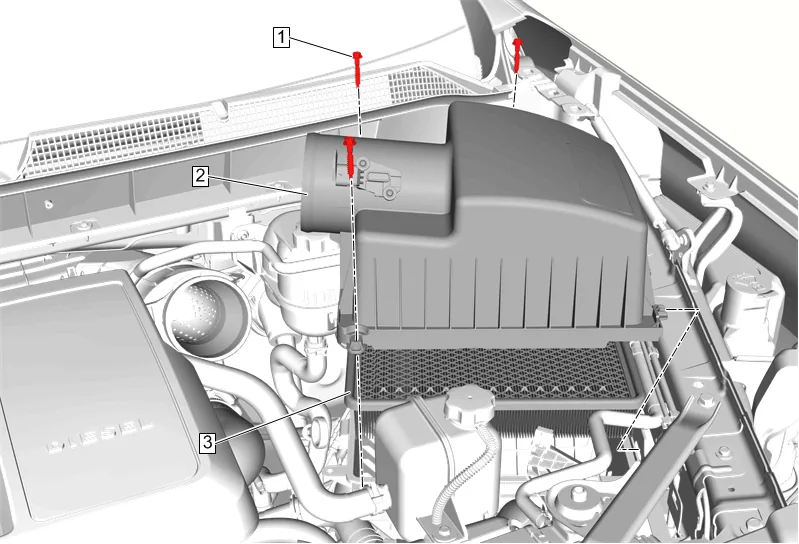
- Air Cleaner Housing Cover Bolt (1) » Remove [3x]
- Air Cleaner Upper Housing (2) » Remove
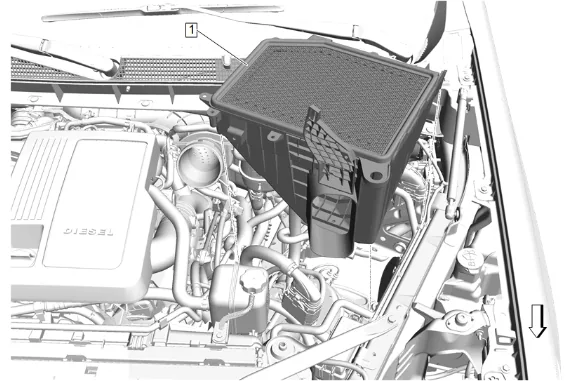
- Air Cleaner Lower Housing (1) » Remove
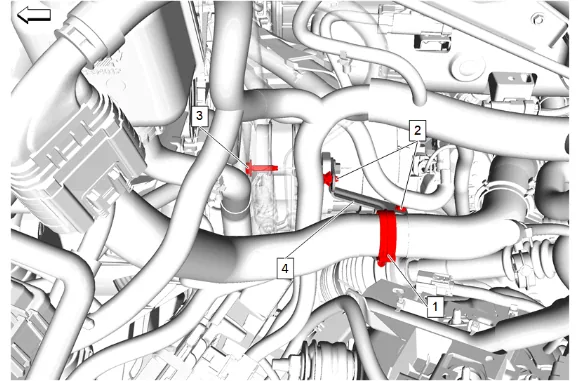
- Radiator Inlet Hose Clip (1) » Disengage
- Engine Wiring Harness Retainer (2) » Remove [2x]
- Engine Wiring Harness Bracket Bolt (3) » Remove
- Engine Wiring Harness Bracket (4) » Remove
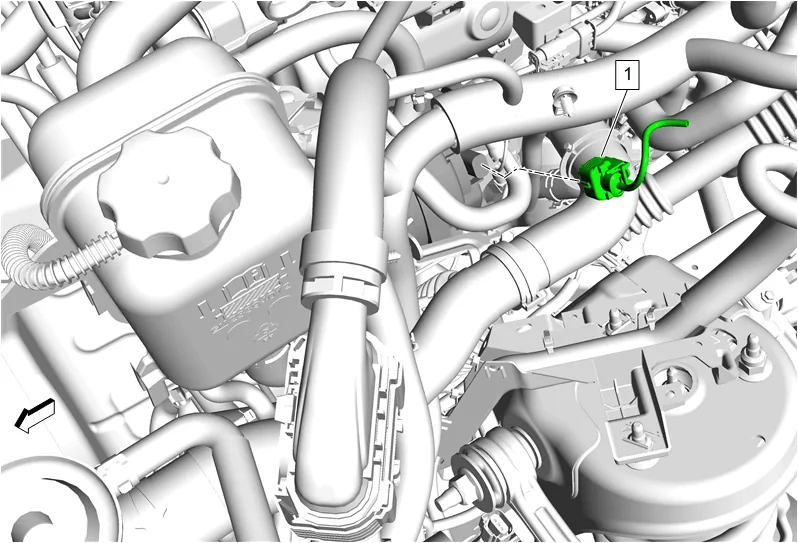
- Electrical Connector (1) » Disconnect
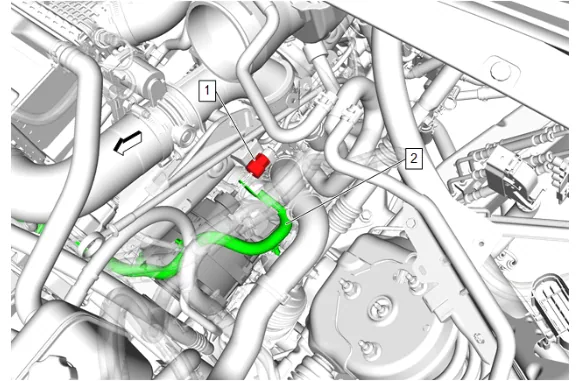
- Battery Positive Cable Nut (1) @ Generator » Remove
- Generator Battery Jumper Cable (2) » Remove
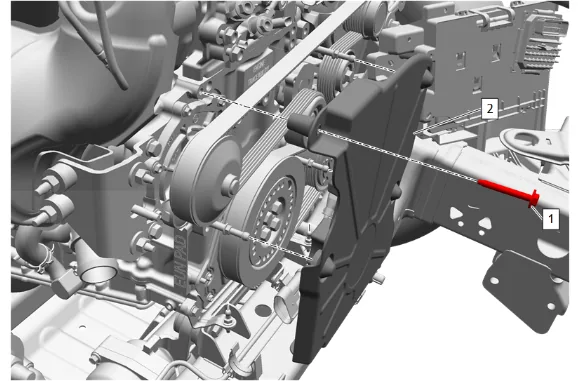
- Engine Front Cover Bolt (1) » Remove
- Engine Front Cover (2) » Remove
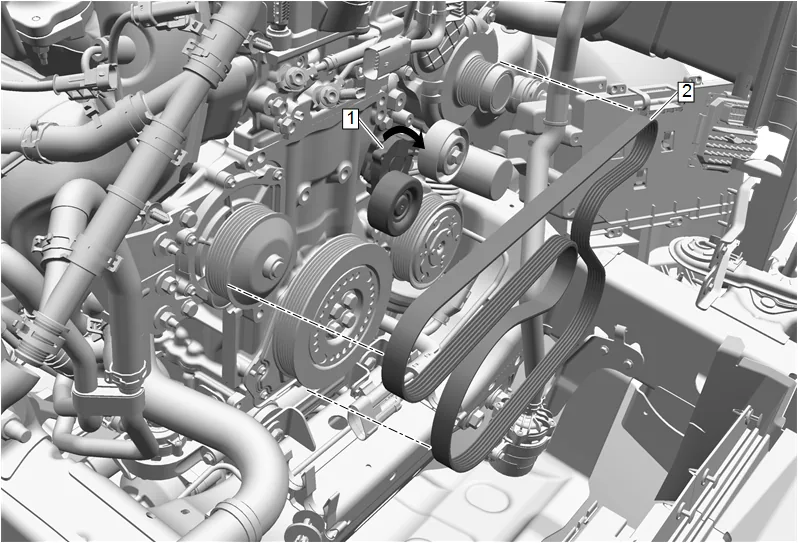
- Rotate the accessory drive primary belt tensioner (1) clockwise to release the drive belt tension.
- Slide the accessory drive primary belt (2) off of the belt idler pulley and slowly release the accessory drive primary belt tensioner (1).
- Remove the accessory drive primary belt (2).
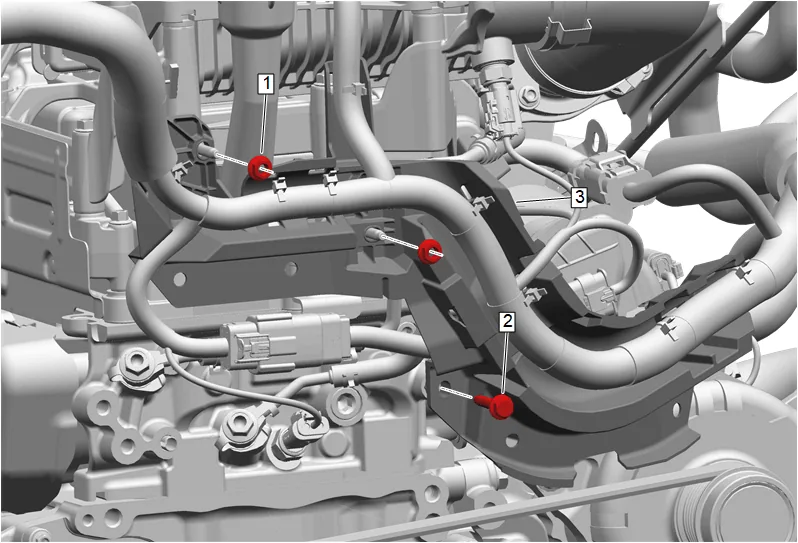
- Engine Wiring Harness Bracket Nut (1) » Remove [2x]
- Engine Wiring Harness Bracket Bolt (2) » Remove
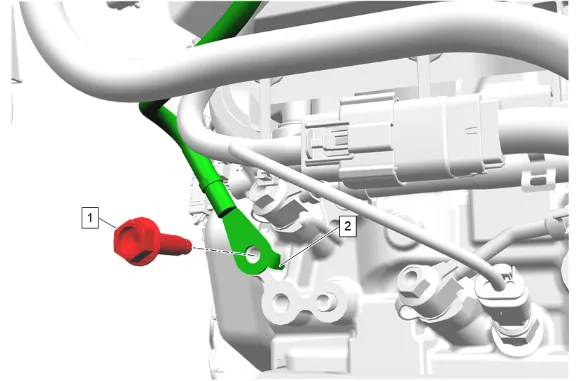
- Engine Wiring Harness Ground Bolt (1) » Remove
- Ground Cable (2) » Position aside
- Disconnect electrical connectors as needed, detach retainer at intake manifold and reposition the engine wiring harness channel (3) away from the front of the engine.
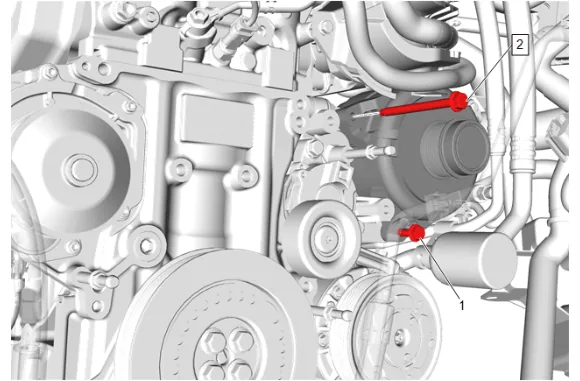
- Generator Bolt (1) » Loosen until disengaged
- Generator Bolt (2) » Remove
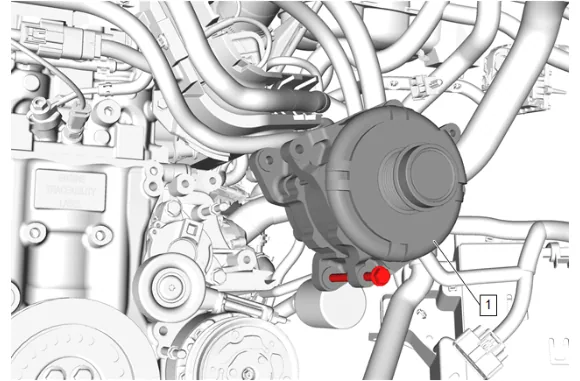
- Generator (1) » Remove
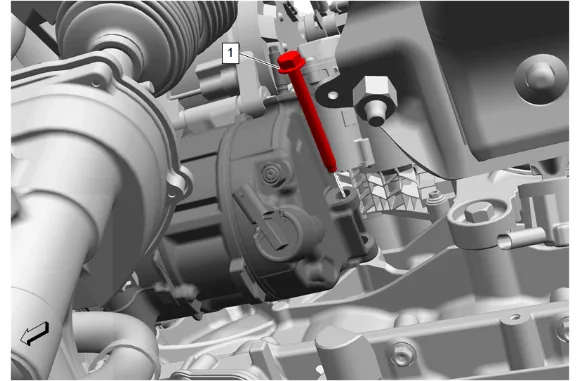
- Air Conditioning Compressor Bolt (1) » Remove
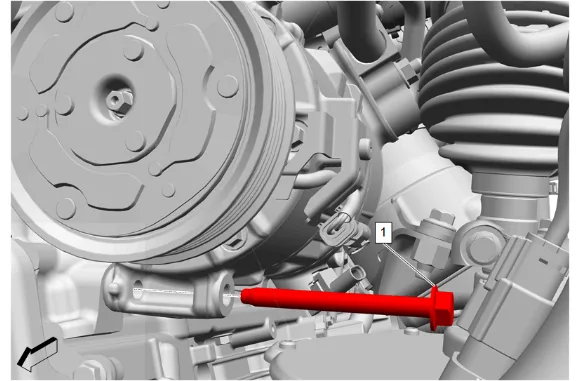
- Air Conditioning Compressor Bolt (1) » Remove
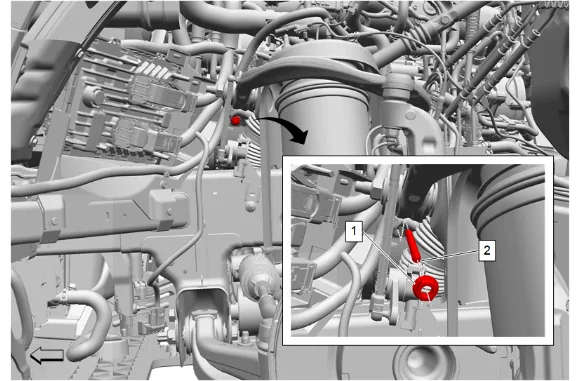
- Air Conditioning Compressor Nut (1) » Remove
- Air Conditioning Compressor Stud (2) » Remove
- Reposition the air conditioning compressor, as needed.
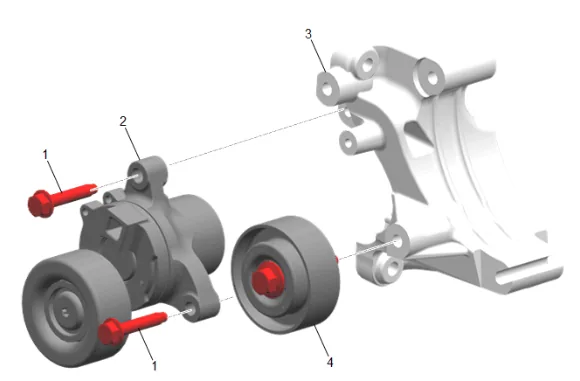
- Drive Belt Idler Pulley (4) » Remove
- Drive Belt Tensioner Bolt (1) » Remove
- Drive Belt Tensioner (2) » Remove
-
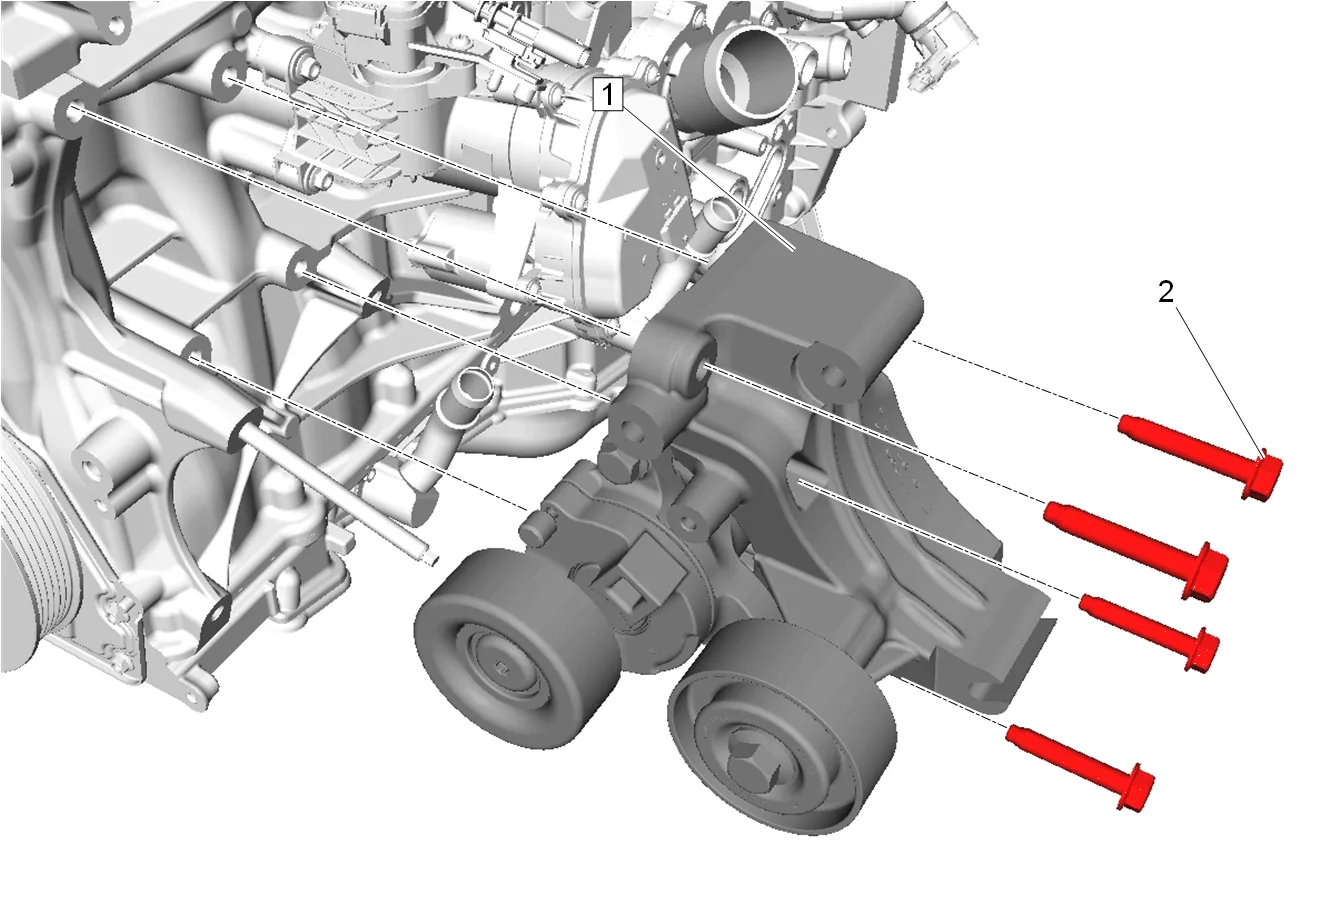
Generator and Air Conditioning Compressor Bracket Bolt (2) » Remove [4x]
-
Generator and Air Conditioning Compressor Bracket (1) » Remove Installation Procedure
-
Generator and Air Conditioning Compressor Bracket (1) » Install
-
Generator and Air Conditioning Compressor Bracket Bolt (2) » Install and tighten [4x] — Fastener Specifications
-
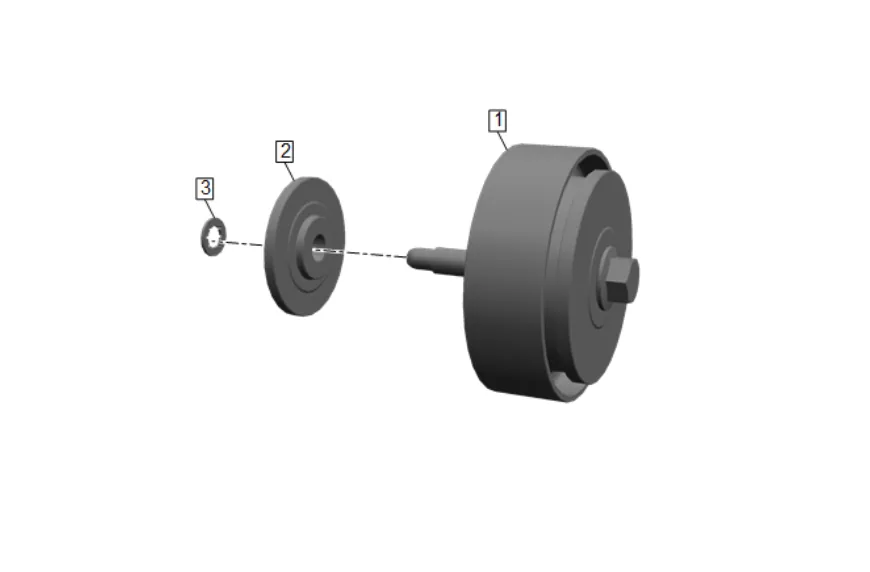
Upon installation of the drive belt idler pulley, the retainer (3) and spacer (2) may detach from the pulley assembly (1). If reinstalling the idler belt pulley, ensure the proper orientation, as shown before reassembling the drive belt idler pulley.
-
Drive Belt Tensioner (2) » Install
-
Drive Belt Tensioner Bolt (1) » Install and tighten — Fastener Specifications
-
Drive Belt Idler Pulley (4) » Install and tighten — Fastener Specifications
-
Install the air conditioning compressor.
-
Air Conditioning Compressor Stud (2) » Install and tighten — Fastener Specifications
-
Air Conditioning Compressor Nut (1) » Install and tighten — Fastener Specifications
-
Air Conditioning Compressor Bolt (1) » Install and tighten — Fastener Specifications
-
Air Conditioning Compressor Bolt (1) » Install and tighten — Fastener Specifications
-
Generator (1) » Install
-
Generator Bolt (2) » Install and tighten — Fastener Specifications
-
Generator Bolt (1) » Install and tighten — Fastener Specifications
-
Position the engine wiring harness channel (3) at the front of the engine, attach retainer at intake manifold, and connect electrical connectors as needed.
-
Engine Wiring Harness Bracket Bolt (2) » Install and tighten — Fastener Specifications
-
Engine Wiring Harness Bracket Nut (1) » Install and tighten [2x] — Fastener Specifications
-
Ground Cable (2) » Install
-
Engine Wiring Harness Ground Bolt (1) » Install and tighten — Fastener Specifications
-
Install the accessory drive primary belt (2) to the vehicle.
-
Rotate the accessory drive primary belt tensioner (1) clockwise.
-
Install the accessory drive primary belt (2) around all pulleys.
-
Slowly release the accessory drive primary belt tensioner (1).
-
Engine Front Cover (2) » Install
-
Engine Front Cover Bolt (1) » Install and tighten — Fastener Specifications
-
Generator Battery Jumper Cable (2) » Install
-
Battery Positive Cable Nut (1) @ Generator » Install and tighten Install and tighten — Fastener Specifications
-
Electrical Connector (1) » Connect
-
Engine Wiring Harness Bracket (4) » Install
-
Engine Wiring Harness Bracket Bolt (3) » Install and tighten — Fastener Specifications
-
Engine Wiring Harness Retainer (2) » Install [2x]
-
Radiator Inlet Hose Clip (1) » Install
-
Air Cleaner Lower Housing (1) » Install
-
Air Cleaner Upper Housing (2) » Install
-
Air Cleaner Housing Cover Bolt (1) » Install and tighten [3x] — Fastener Specifications
-
INstall all wiring harness retainers to the air cleaner.
-
Air Cleaner Nut (2) » Install and tighten — Fastener Specifications
-
Connect the 2 electrical connectors (5) to the mass air flow sensor and the air cleaner.
-
Air Cleaner Outlet Front Duct (2) » Install
-
Air Cleaner Outlet Front Duct Clamp (1) » Tighten [2x] — Fastener Specifications
-
Install the charge air cooler, condenser, fan, and radiator assembly. Charge Air Cooler, Condenser, Fan Motor, and Radiator Assembly Removal and Installation